By continuing to use the website or clicking Accept you consent to our cookies and personal data policy and confirm that you are at least 18 year old. For details please see Privacy Policy and Terms
Accept
Likes
Comments
Share


@masterofsmeagol
Follow
9/26 This fucking sucks. Site won't let me upload pictures. Flood warning in effect. I believe this is the fifth day of rain. Not trickles. Sheet rain and high winds. My dream catchers have been taking this like a champ. Ice cream cake was totally sideways for awhile despite vertical trellis. I came down this morning to branches bent at 90° angles. I could've taken them but if I make it through this rain today it's supposed to stop tonight. Then I'll have a week of good weather. Buds are exploding. Even the ice cream cake. That will need more time but I'm getting close with the others. They are never out of sight. I'm surprised they've held up so well so far. I made my decision it would be stupid to alter it now, seeing how the storm is ending. I was going to spray k bicarb but I'll wait until after this rain.UPDATE: Went back over and the garden was flooded. I needed to put one grow bag on top of another as one plant was in six inches of water. I drained it and added supports and pulled off any dead leaves. I tried taking a video but it was raining so hard it stopped after 7 secs. Luckily my dreamcatchers are strong AF. Took to little ones and put them under the barn under a light. It's FINALLY stopped raining. After I smoke I gotta go back over and shake buds again and check for rot. Luckily nothing was broken but it was hanging right down. Fucking sucks. Spent like two hours in sheet rain. UPDATE: Stopped raining. I went over and continued to defoliate and cut little bits of rot from the interior. Sprayed a gallon of potassium bicarbonate and dawn on ever spot of rot I could find. I've been to the patch multiple times today. Found a few earwigs. I think I've found my problem. Late stage leaf septoria with earwigs eating the rotting plant matter. Fucking sucks but at least I have an idea. Can't upload pics and phone wouldn't even work in the rain. One 7 second video.
9/27 The extra work I've been putting in has certainly helped. I got in touch with a company who will do any type of extraction I want for $200 a lb. Fucking awesome. My cousin got 250 grams love rosin last year with this same company. I am sore. I checked trichs but I'm not seeing much Amber yet. Buds are gaining density fast. At least now that I have an idea what my problem is I can address it. Plants showed signs of pm after drying out. I did a k bicarb spray and this morning there isn't a spot. I need to take care of what's hanging so that's the plan today.
9/28 I think I made the right decision.my plants are looking good. Not where I want them but it's getting close. I checked the trichs this morning. Under 24 hour surveillance till harvest. Well it has been but now I stay up every nigh watching the cctv. Went down in the middle of the night to check for nocturnal bugs. Didn't find any. I've been defoliating the yellow septoria leaves. I went through every plant and cut out any rot and removed andy sugar leaves that started to turn brown. This and the k bicarb seem to help. I think that Leaf septoria has dwarfed the growth of the smaller dream catcher. Buds don't seem to be growing much more. Even my ICC has buds almost the size of the little one. The other dreamcatcher will probably be an elbow plant. The ice cream cake has beefed up incredibly and is covered in trich's. I'm super excited but I'm cautious at the same time. I hate that fucking dog but it's an added layer of security. Soon I'll do the harvest report for DJ short blueberry.
9/29 Trich's are changing fast. Haven't been watering lately do to all the rain. Plants are real real close. Up all night watching. Dog flipped out at 4am but no one was there. I want to wait until I have a little more Amber but I'm super excited. I may end up taking some tops. May end up doing a k bicarb spray today. Haven't decided yet. I'll update as I go. I've been making head way trimming the blueberry.
9/30. Things are looking beautiful. The smell at the garden is amazing. Lots of hard work left. Plants do have septoria and slight pm so I may do a bud wash. I cut a branch from each plant. I think I'm at the point of diminishing returns. Every wet night mold and critters take more and the chances of some idiot coming to try and take my shit increases. I may end up harvesting a little earlier. I'd lie to wait but the trichs look pretty good to me. Still doing all the maintenance required. I am extremely proud of this grow. I fought everything this year. Started with mites and thrips. Powder mildew came with them too. Now I've faced every pest or disease this year. At least it seems that way. I've seen the horror stories on my local Facebook thread. Leave your comments and let me know what you think about trichome stages and whether it would be ok to harvest.
10/1 Rained last night. Defoliated and removed some rot. I'll update later in the day.
10/2 Rained last night and I have A LOT to update which I will later.


Likes
27
Share


@420
Follow
Leider war von Tag 13 bis 16 vermutlich das Licht 24/7 an. Hoffentlich werden die Pflanzen nicht zwittern.

Processing
Likes
74
Share


@Mr_Maes
Follow
We are officially in full bloom. The have been enjoying 6-7 hours of sun light per day for about 4 days now, then brought back in under the cobs. The girls are all exploding with growth and stacking what I expect to be huge buds.


Likes
5
Share


@CanadianFillmore
Follow
Week 8, the last feed! Defoliated to let more air flow and light penetrate down into the lowers of the plant. Bud's are sticky, plant is covered in frost, the pics don't do it justice. For a small pot grow, she's not that far behind her big pot sister

Likes
56
Share


@Master_weeda
Follow
Bonjour à tous les padawans et maîtres jedis
Jour84 arrosage avec 2 litres d'eau ph6.3
Jour86 arrosage avec 2. 5litres d'eau ph6.3
Jour89 arrosage avec 2 litres d'eau ph6.3
LE MEILLEUR MOMENT POUR RINCER SON CANNABIS
Le rinçage commence en général deux semaines avant la récolte. Si le plant a une période de floraison de huit semaines, le rinçage doit commencer six semaines après le début de la période de floraison. Il est préférable de regarder de près les trichomes sur le plant pour déterminer quand votre cannabis est prêt à être récolter. Si les petits trichomes commencent juste à passer d’une couleur transparente à une teinte laiteuse et blanche, c’est une bonne indication que les plants peuvent commencer à être rincés. Il faut s’arranger pour que la majorité des trichomes aient changé vers la couleur désirée pour la récolte après deux semaines – ça devient plus facile à faire avec l’expérience, alors accrochez-vous !
Le rinçage peut également être un bon moyen de remettre à zéro la terre quand un plant est toujours en phase de croissance végétative. Parfois, un cultivateur suralimente par accident son cannabis, ce qui provoque un changement de couleur et un flétrissement du bout des feuilles. Ceci est appelé une « brûlure par nutriments ». Rincer la terre peut éliminer les nutriments excédentaires, ce qui aide à résoudre le problème. Cependant, c’est une mesure drastique à ce stade de la culture, alors assurez-vous que le problème soit bien une brûlure par nutriments et non quelque chose d’autre.
Le rinçage ne concerne pas que le moment de la récolte. Cette technique peut aussi être mise en place durant la phase de croissance afin de débarrasser le sol des nutriments. Bien évidemment, les nutriments permettent à votre plante de rester en bonne santé et vous assurent des rendements maximaux, mais une trop grande quantité peut causer une accumulation et un état statique durant lequel la plante ne peut plus y accéder.
Le blocage des nutriments peut être causé par une accumulation saline ou des niveaux de pH incorrects. Ces deux causes peuvent être résolues par un rinçage de votre plante à l’eau claire. Les fluides viendront pousser les nutriments en dehors du substrat et le débarrasseront de l’accumulation, permettant ainsi aux racines de pouvoir accéder à nouveau aux nutriments.
EMPÊCHER LE BLOCAGE D'ABSORPTION DES NUTRIMENTS AVANT QU’IL NE POSE PROBLÈME
Au mieux, le blocage des nutriments peut être un problème, au pire, il peut être un vrai désastre. Comme le dit l’adage, il vaut mieux prévenir que guérir. Il vaut mieux prendre de l’avant pour empêcher le blocage des nutriments plutôt que de s’y atteler lorsque c’est trop tard.
Empêcher le blocage des nutriments peut se faire par le biais d’un rinçage de routine. En rinçant vos plantes une fois avant la floraison et une fois au milieu de cette dernière, vous minimiserez l’accumulation de nutriments.
LES ENZYMES À LA RESCOUSSE
Après le rinçage pour contrer l’accumulation ou le blocage des nutriments, vous remarquerez peut-être que vos plantes ont une apparence vert foncé, c’est le signe d’un excès de nutriments. Dans ce cas, certains cultivateurs choisissent d’ajouter une formule riche en enzymes à leur substrat.
Au cas où vous auriez oublié vos cours de biologie, les enzymes sont des protéines qui catalysent les réactions. Elles aident à rincer le substrat en décomposant l’amidon, les glucides et les nutriments. Il existe sur le marché toute une variété de produits qui contiennent des formules d’enzymes très efficaces.
Si l’eau ne suffit pas à vos plantes, ces petites protéines ne feront qu’une bouchée de l’accumulation de nutriments !
COMMENT BIEN RINCER SON CANNABIS
Rincer votre plant de cannabis est un processus simple. À chaque fois que vous apporteriez normalement des nutriments, vous rincez à la place. De l’eau du robinet non traitée est tout ce dont vous avez besoin pour rincer, assurez-vous juste que son pH est sans danger pour le cannabis. La plupart de l’eau de puits a un pH sain et ne nécessite pas de traitement, mais s’il est nécessaire de traiter l’eau de rinçage pour avoir un pH adapté, faites-le. Les ajustements du pH seront donc la seule chose à considérer.
Inonder la terre avec autant d’eau fraîche qu’elle puisse contenir. Laissez l’eau durant quelques minutes pour qu’elle puisse absorber les nutriments, puis inondez la terre encore pour rincer les nutriments loin du plant. Si vous cultivez en intérieur dans des pots, notez la couleur de l’eau qui s’échappe du fond des pots. Elle sera tâchée et aura une couleur sale. C’est à cette étape qu’un appareil de mesure des TDS (Total des Solides Dissous) est utile. Si vous récupérez et mesurez le TDS de l’eau « évacuée », elle devrait avoir un taux de 1300ppm, ce qui est assez élevé. Il est important de rincer le plant jusqu’à ce que total baisse à un niveau de 50ppm, ou du moins qu’il s’approche du TDS de l’eau fraîche que vous utilisez pour rincer le plant. La couleur de l’eau d’évacuation va s’éclaircir et apparaîtra plus propre. Vous devez tirer autant que possible de minéraux dissous du plant.
Comment et Quand Rincer les Plants de Cannabis
Rincer les plants de cannabis avant la récolte peut faire la différence entre les meilleurs têtes ou la plus rude pour la gorge. Cette petite tâche est simple et facile à faire. Ajoutez juste de l’eau ! Attention car le moment du rinçage joue un rôle critique.
Le b.a.-ba du rinçage de ses plants de cannabis.
Sommaire:
1. Qu’est-ce que le rinçage ?
2. Le meilleur moment pour rincer son cannabis
3. Empêcher le blocage d'absorption des nutriments avant qu’il ne pose problème
4. Les enzymes à la rescousse
5. Comment bien rincer son cannabis
6. Comment rincer ses plantes en hydroponie
7. Les résultats du rinçage de son cannabis
8. Quand éviter de rincer son cannabis
Vous avez enfin fini vos cultures et vous vous retrouvez avec un magnifique plant couvert de super têtes, maintenant sèches, vous avez fait le curing et vous êtes prêt à fumer – et pourtant quelque chose ne va pas. La weed semble ne pas vouloir se consumer et quand vous tirez une bouffée, c’est comme si on vous avait donné un coup de poing dans les poumons et vous toussez en craignant pour votre vie ! Le goût est rude et décevant. Si c’est une situation que vous avez vécue, il y a des chances pour que vos plants n’aient pas été rincés correctement avant la récolte.
Cette fumée bien loin d’être agréable est provoquée par la présence dans le plant des nutriments et minéraux utilisés lors de la culture, ce qui altère la façon dont le plant se consume. Rincer le plant élimine ces nutriments restants, ce qui améliore la qualité des sensations. Heureusement, le rinçage des plants de cannabis se fait facilement et sans effort, et cela vous permet de produire des têtes douces et délicieuses en un rien de temps.
ARTICLE LIÉ
Comment Utiliser les Nutriments pour Cannabis
QU’EST-CE QUE LE RINÇAGE ?
L’acte de rincer un plant implique d’utiliser de l’eau pour éliminer tout nutriment présent dans la terre. Une grande quantité d’eau est passée à travers la terre et drainée sur une base régulière. Tous les minéraux et nutriments présents dans la terre sont rincés avec le temps avec l’eau, ce qui laisse une terre propre.
Mais pourquoi vouloir éliminer tous les minéraux de la terre ? N’est-ce pas mauvais pour la récolte ? En fait, cela aide à la récolte de manière significative. Quand les nutriments sont éliminés de la terre, ceci force le plant de cannabis à utiliser tous les nutriments toujours présents dans le plant. C’est comme pour le corps humain. Quand on consomme beaucoup d’aliments, ce que nous n’utilisons pas est transformé en graisses. Dans les situations extrêmes où la nourriture est rare, le corps s’appuie sur cette graisse stockée pour tirer de l’énergie.
Comme rincer force le cannabis à utiliser tous les nutriments restants dans le plant, aucun ne devrait rester et altérer les têtes récoltées. Cependant, si vous le faites trop tôt, cela peut nuire à la santé du plant, le moment est donc clé.
LE MEILLEUR MOMENT POUR RINCER SON CANNABIS
Le rinçage commence en général deux semaines avant la récolte. Si le plant a une période de floraison de huit semaines, le rinçage doit commencer six semaines après le début de la période de floraison. Il est préférable de regarder de près les trichomes sur le plant pour déterminer quand votre cannabis est prêt à être récolter. Si les petits trichomes commencent juste à passer d’une couleur transparente à une teinte laiteuse et blanche, c’est une bonne indication que les plants peuvent commencer à être rincés. Il faut s’arranger pour que la majorité des trichomes aient changé vers la couleur désirée pour la récolte après deux semaines – ça devient plus facile à faire avec l’expérience, alors accrochez-vous !
Le rinçage peut également être un bon moyen de remettre à zéro la terre quand un plant est toujours en phase de croissance végétative. Parfois, un cultivateur suralimente par accident son cannabis, ce qui provoque un changement de couleur et un flétrissement du bout des feuilles. Ceci est appelé une « brûlure par nutriments ». Rincer la terre peut éliminer les nutriments excédentaires, ce qui aide à résoudre le problème. Cependant, c’est une mesure drastique à ce stade de la culture, alors assurez-vous que le problème soit bien une brûlure par nutriments et non quelque chose d’autre.
Flushing
Le rinçage ne concerne pas que le moment de la récolte. Cette technique peut aussi être mise en place durant la phase de croissance afin de débarrasser le sol des nutriments. Bien évidemment, les nutriments permettent à votre plante de rester en bonne santé et vous assurent des rendements maximaux, mais une trop grande quantité peut causer une accumulation et un état statique durant lequel la plante ne peut plus y accéder.
Le blocage des nutriments peut être causé par une accumulation saline ou des niveaux de pH incorrects. Ces deux causes peuvent être résolues par un rinçage de votre plante à l’eau claire. Les fluides viendront pousser les nutriments en dehors du substrat et le débarrasseront de l’accumulation, permettant ainsi aux racines de pouvoir accéder à nouveau aux nutriments.
EMPÊCHER LE BLOCAGE D'ABSORPTION DES NUTRIMENTS AVANT QU’IL NE POSE PROBLÈME
Au mieux, le blocage des nutriments peut être un problème, au pire, il peut être un vrai désastre. Comme le dit l’adage, il vaut mieux prévenir que guérir. Il vaut mieux prendre de l’avant pour empêcher le blocage des nutriments plutôt que de s’y atteler lorsque c’est trop tard.
Empêcher le blocage des nutriments peut se faire par le biais d’un rinçage de routine. En rinçant vos plantes une fois avant la floraison et une fois au milieu de cette dernière, vous minimiserez l’accumulation de nutriments.
LES ENZYMES À LA RESCOUSSE
Après le rinçage pour contrer l’accumulation ou le blocage des nutriments, vous remarquerez peut-être que vos plantes ont une apparence vert foncé, c’est le signe d’un excès de nutriments. Dans ce cas, certains cultivateurs choisissent d’ajouter une formule riche en enzymes à leur substrat.
Au cas où vous auriez oublié vos cours de biologie, les enzymes sont des protéines qui catalysent les réactions. Elles aident à rincer le substrat en décomposant l’amidon, les glucides et les nutriments. Il existe sur le marché toute une variété de produits qui contiennent des formules d’enzymes très efficaces.
Si l’eau ne suffit pas à vos plantes, ces petites protéines ne feront qu’une bouchée de l’accumulation de nutriments !
Comment et Quand Rincer les Plants de Cannabis
COMMENT BIEN RINCER SON CANNABIS
Rincer votre plant de cannabis est un processus simple. À chaque fois que vous apporteriez normalement des nutriments, vous rincez à la place. De l’eau du robinet non traitée est tout ce dont vous avez besoin pour rincer, assurez-vous juste que son pH est sans danger pour le cannabis. La plupart de l’eau de puits a un pH sain et ne nécessite pas de traitement, mais s’il est nécessaire de traiter l’eau de rinçage pour avoir un pH adapté, faites-le. Les ajustements du pH seront donc la seule chose à considérer.
Inonder la terre avec autant d’eau fraîche qu’elle puisse contenir. Laissez l’eau durant quelques minutes pour qu’elle puisse absorber les nutriments, puis inondez la terre encore pour rincer les nutriments loin du plant. Si vous cultivez en intérieur dans des pots, notez la couleur de l’eau qui s’échappe du fond des pots. Elle sera tâchée et aura une couleur sale. C’est à cette étape qu’un appareil de mesure des TDS (Total des Solides Dissous) est utile. Si vous récupérez et mesurez le TDS de l’eau « évacuée », elle devrait avoir un taux de 1300ppm, ce qui est assez élevé. Il est important de rincer le plant jusqu’à ce que total baisse à un niveau de 50ppm, ou du moins qu’il s’approche du TDS de l’eau fraîche que vous utilisez pour rincer le plant. La couleur de l’eau d’évacuation va s’éclaircir et apparaîtra plus propre. Vous devez tirer autant que possible de minéraux dissous du plant.
COMMENT RINCER SES PLANTES EN HYDROPONIE
Le rinçage des plantes en hydroponie est bien plus simple que de se débarrasser des nutriments en terre. Les cultivateurs en hydroponie pourront simplement drainer leur système et le remplacer par une eau au pH neutre.
Le rinçage des plantes en hydroponie est aussi un processus bien plus court. Une fois que la réserve d’eau aura été modifiée, les plantes en hydro n’auront pas accès aux nutriments externes. Pour cette raison, un rinçage de deux jours suffira.
LES RÉSULTATS DU RINÇAGE DE SON CANNABIS
Après la récolte des têtes, prenez du temps pour bien faire le curing pour atteindre le potentiel le plus élevé. Un affinage correct par curing permet de réduire encore plus le côté rude des têtes, en éliminant des choses comme un excès de chlorophylle. Vous serez étonné de voir la différence que ce petite effort peut avoir sur votre produit. Tout votre travail se sentira dans la première bouffée de cette weed douce comme de la soie, qui caresse la gorge comme du miel. Le plus doux de la nature. Vous pouvez donc améliorer la qualité de votre cannabis en ajoutant juste de l’eau !
QUAND ÉVITER DE RINCER SES PLANTES
Le seul moment où nous recommandons d’éviter le rinçage de son cannabis est lorsque l’on travaille avec une terre biologique amendée ou un super soil. Ces substrats ont été développés avec précaution afin d’héberger des micro-organismes bienfaisants tels que des bactéries ou des champignons. Cette délicate biodiversité pourrait être éliminée et endommagée par le rinçage.
Une fois de plus, l’absence de rinçage ne devrait pas poser de soucis, car aucun nutriment externe ou synthétique n’aura été ajouté au substrat. À la place, les plantes comptent sur les micro-organismes pour décomposer la matière organique et la livrer aux racines.
May the force be with you 💪

Likes
60
Share


@BOMbolenath
Follow
Harvest done, plant is drying.
116 days from seed: 51 days veg + 65 days flora

Likes
15
Share


@Bread_n_Buds
Follow
And it starts like this. an official collaboration starts with the friends of Zamnesia, from today I will only grow, grow and flower Zamnesia Seeds plants and I really like it.
We are close to a flowering in the extreme heat and therefore we opted to start with 4 very fast F1s, they are not joking guys when they tell you that they are made to be more resistant, stable and fast they are not telling you something false. The girls are super fast, even those from other brands tried in the past are excellent and a sliver and this one from Zamnesia have all it takes to be the best autoflowering on the market.
The Wurlz F1s were also born at the speed of light, 18 hours in water, 24 on land and we were already born, both of us.
Oh yes, a lot of research is being done on autoflowering plants, you have all noticed monstrous improvements compared to Low Rider and subsequent derivatives.
Whoever works best wins and from what I have been able to see so far Zamnesia is working very well. I know, there is a group of sceptics, friends I'm here on purpose, give me a couple of months and we'll see.
Zamnesia is the best online shop in the situation, you can find everything from seeds, to mushroom kits, through vaporizers and a thousand other things https://www.zamnesia.io
Wurlz F1 seeds specifically
https://www.zamnesia.com/10669-zamnesia-seeds-wurlz-f1-automatic.html
Site Description
ZAMNESIA SEEDS - WURLZ F1 HYBRID AUTOMATIC: EFFECTS TO LEAVE YOUR HEAD IN A WHIRL!
As the end product of combining Runtz with Watermelon Candy, Wurlz F1 hybrid Automatic showcases a reliable, uniform, and, above all, easy growing experience. The resulting buds offer mind-blowing flavors and soothing effects, making Wurlz F1 Automatic more than worthy of being on your radar.
GROWING WURLZ F1 HYBRID AUTOMATIC
As an autoflowering strain, it takes just 9–10 weeks for Wurlz F1 Automatic to move from germination to harvest. Fortunately, there's very little required other than a bit of maintenance along the way. This is partly due to the F1 genetics that make this strain robust and uniform, resulting in plants that reach a similar height and provide a similar (large) yield. Moreover, Wurlz F1 Automatic is highly resistant to disease, pests, and other ailments.
Reaching heights of about 65–80cm, Wurlz F1 Automatic is not an overbearing plant and can fit into smaller spaces with zero fuss. Once ready to yield, growers have the potential to see a return in the region of 450–500g/m² indoors and 50–150g/plant outdoors.
AROMAS, FLAVORS, AND EFFECTS OF WURLZ F1 HYBRID AUTOMATIC
After Wurlz F1 Hybrid Automatic wows you with its easygoing growing experience, the best is yet to come: the smoke test. Teeming with terpenes, this cultivar offers a fruity and candy-like flavor tinged with just a little bit of pine for good measure. In terms of effects, Wurlz F1 Automatic is bolstered by 24% THC and a finely tuned array of cannabinoids, making for a soothing, physically relaxing, and, in larger amounts, couch-locking high. So settle in with some of your favorite friends, snacks, and movies; this is relaxation at its finest.

Likes
Comments
Share


@Sativ_420
Follow
Esta semana volvió a tener todas las hojas sanas. Le complete de tierra las macetas y les hice supercropping para controlar la altura porque no se cuando van a florar

Likes
10
Share


@Arcadium
Follow
Weathers been great, a little cold in the mornings, but sunny and 25c every day. Flowering looking great, close to week 5. All the LST done, now to just sit back and wait. Heavy top dress of compost mixed with 70/30 Gaia Green PB/AP (20Tbsp). Weekly spray of BT/Lactobacillus/Epsom, occasionally soil drench of Lactobacillus as well, which is 50% molasses (1-2 Tbsp per gallon).
Still seeing tons of moth / caterpillar eggs on mesh netting, but the wasps are making short work of them.
Nice even (almost) canopy is making for some great uniform flowering.
**Bonus last picture** I had an extra GC FF as a "backup", planted same time but early flowered due to root bound 7 gallon I assume, notice all the single bladed fan leaves, stress maybe? Just harvested, looks good, but I'm sure my main plant will be much better.. Early flowering was sure nice.
Likes
14
Share

@Rangaku
Follow
She’s done now ,just going in for a dark 48 hours with the dehumidifier and I’ll be clipping and chopping. Good times ahead

Likes
29
Share


@eldruida_lamota
Follow
Vamos familia que viene la sexta semana de floración de las Titan f1 y jodo cómo se notan los cambios de una semana a otra al menos está semana si note buen cambio, las flores se están formando guay y se están poniendo repletas de tricomas.
Es de las cepas nuevas más potentes en thc tengo ganas de probarla.
Pero para autos va guay.
Temperaturas máximas de 30 y mínimas de 25 grados.
La humedad relativa está en torno al 40%
Ya entramos en la recta final a partir de ahora solo agua
Agrobeta:
https://www.agrobeta.com/agrobetatiendaonline/36-abonos-canamo
Mars hydro:
Code discount: EL420
https://www.mars-hydro.com/
Hasta aquí es todo , espero que lo disfrutéis, buenos humos 💨💨.
Likes
24
Share


@Firepharmer
Follow
This last week shit got really frosty !! The monkey berries is wicked the terps are creamy sour milk and cherry halls mmmmmmm I’m thinking about 7 to 10 days more then start flushing the monkey berries . Slurricane is putting on the weight like there’s no tomorrow and frosty too with 4 weeks to go she will be my best run by far, terps grapefruit and sweet skunk


Likes
60
Share


@420DeepGrow
Follow
La segunda semana fue bien, a las plantas que estiraban más les causé Low Stress para mantener una altura igualada.
De las 3 variedades que tengo, es la que antes ha mostrado las preflores.
Un error vuelvo a repetir ha sido no tener medidor de EC-PH y otro ha sido el haberme excedido con los s riegos.
Conecto pronto el CO2 a 630ppm par ver si así logro obtener un buen estiramiento esta semana.
📅 Día 15: 🔹 Mal día, elimino 2 machos y me quedo con mucho espacio libre en el armario. La próxima vez que ponga semillas regulares será en un armario doble o en exterior. De los errores se aprende, pero quería proner esta variedad tan exquisita.
📅 Día 16: 🔹 Riego según la tabla de nutrientes. Conecto CO2 a 700ppm.
📅 Día 17 : 🔹 Low Stress para que dé más luz a las ramas bajas y tengan más espacio para desarrollar. No quito hojas ya que creo que les quitas los paneles que las alimenta. El riego de ayer las sentó muy bien y están bebiendo el agua rápido por fin.
📅 Día 18:🔹 Descanso, puntualizar que he activado el CO2 a 730ppm y decir que se han bebido todo el agua, mañana toca riego.
📅 Día 19: 🔹Riego según la tabla de nutrientes. La EC me dio 2000 y el pH 6.3
📅 Dia 20:🔹Pequeño Low Stress.
📅 Dia 21🔹Sigo con el Low Stress, la próxima vez usaré pinzas para dirigir las ramas, será mucho menos agresivo y obtendré mejores resultados.

Likes
45
Share

@masterofsmeagol
Follow
I Messed Up A DAY Here. So one of the days is dated wrong. I tried to correct it the best that I could.
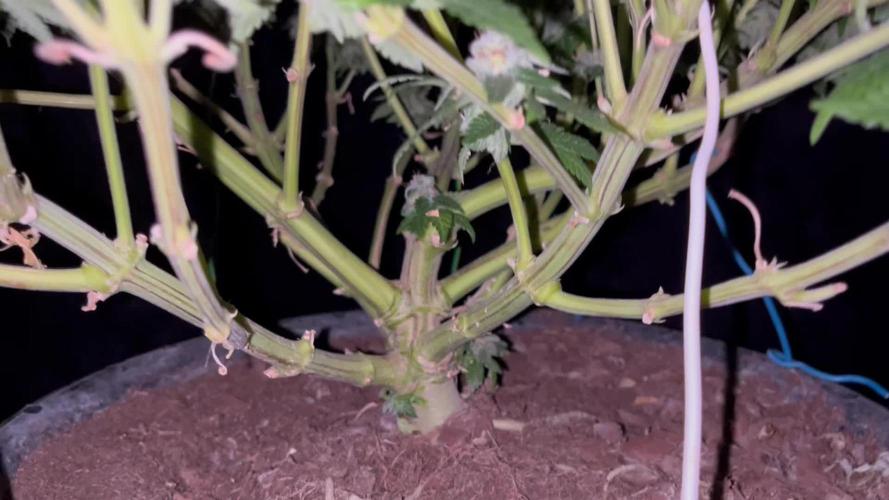
7/24 I decided to label this week as flower. It's more like preflower though. GMOs are stretching like crazy. Due to the rain we weren't supposed to get some of my plants are a little over watered. That's why I love the fabric pots. With the winds we get the bags dry out fast. The GMO's would've needed water anyway if we didn't get this storm. Event Horizon seems to be the furthest in flower amd the most over watered. WE'LL get a LITTLE more rain today and tomorrow but then hopfully my bags will dry out. They are heavy as hell right now. Had we not got rain for what seems like forever. Several plants would've needed to be watered if we didn't get this rain. Still the plants are currently overwatered. All the pics and video so far are from this morning after the horrible pounding rain of yesterday. Like I said before, I need to; defoliate for better air flow, add secondary supports or a vertical trellis, considering using a preventative pest application (e.g. BT), LST and spread branches apart and start using nutes.
7/25 Wasn't supposed to rain today. Like .001. It poured this morning and is still raining VERY LIGHTLY at 2:30. We got an inch yesterday. The total for these 3 days was suppised to be under half an inch. Anyway I went over around two and everything looks great! Things are clearly overwatered and heavy but the plants look happy! Most have their leaves out and everything! I love growing in bags because they dry out so quickly! I don't mind watering more. I defoliated one event horizon and the few yellow leaves I coukd see on other plants after shaking them off. The seedling in the 50 is far behind the others in flower and just showed its sex. I'm fairly certain that one is red runtz. Whatever it is is going to flower much later than the rest. It's going to be good if I have couple early finishers. I did a video but I'll have to upload tomorrow. I have a lot of work to do And not just in the garden so I'm hoping I can balance things out and get this stuff done. Caught three TINY inch worms. I'm wondering if me manually hunting has cut the adult population down and I'm just getting fresh born ones? If that's the case I wouldn't need to spray.
7/26 Plants looked pretty great today. I think me manually removing pillars has made a big difference. It's windy out too so it won't take long for those bags to dry out. Which is good because what wad supposed to be a half inch of rain turned into 3 straight days of rain. I'll be back over to work on the garden today and I'll update then.
7/27 Plants are looking pretty good. Good weather ahead and the bags are starting to lose weight. Found a pillar wrapped in a dead interior leaf all wrapped up. Found a couple more early this morning amd killed them. I did some slight leafing on some plants. I don't like doing that outdoors but since these are monster cropped they have far to many leaves. Airflow is improved. I'm not seeing any nutrient deficiencies yet. Plants are a vibrant healthy dark green. Soon I'll add a base nute like big bloom or ancient amber (I think that's the one, it's applicable to big bloom). I cam see some plants trying to start flowering and I've got one (in the 50) that has just shown sex. Hopfully this will give me some time between harvests. I'll update as I go along.
DAD CALLED IN THE AFTERNOON AND SAID HE THOUGHT A PLANT MIGHT BE STARTING TO DROOP. IT WAS MY GMO CANARY THAT GETS HIT ON ALMOST THREE FULL SIDES BY WIND (ONLY ONE PLANT). I CHECKED THE WEIGHT AND IT WAS LIGHT. IT WAS DROOPING TOO. I WATERED THAT ONE PLANT WITH A GALLON AND WATCHED IT PERK BACK UP. I CHECKED THE WEIGHT ON THE OTHER PLANTS AND LIKE I THOUGHT THEY WERE STILL HEAVY. I PUT MY FINGER IN THE SOIL AND IT CAME AWWY COVERED IN DIRT. MY SEEDLING IN THE 10 WAS KINDA LIGHT SO I GAVE THAT HALF A GALLON. I USED THE OTHER HALF AS "A CUP OF KINDNESS" ON THE PLANTS THAT SEEMED LIGHTEST TO CARRY THEM OVER. I PROBABLY SHOULDVE WAITED BUT I DOUBT IT MATTERS. ILL CHECK IN THE MORNING. I ASSUME ILL HAVE TO WATER THEN OR AT NIGHT. ILL GO BY THE WEIGHT. THE CANARY WILL NEED TO BE ON A SEPERATE SCHEDULE. THATS FOR SURE. Went back over at 6:30 and plants looked better than they have in a long time bags still have some weight. With the sunny weather we are going to have these plants will keep exploding in growth. Found one pillar but I wasn't there long. Seriously considering a spray of BT in the near future.
EDIT: UNFORTUNATELY MY SPIDEY SENSE STARTING TINGLING AROUND NOON. MY ANXIETY WONT LET ME IGNORE IT (IM NOW EMBRACING IT) AND I HAD TO CUT OFF A CONVERSATION WITH MY WIFE TO GO TO THE GARDEN. I IMMEDIATELY SAW THAT ONE OF MY GMOS WAS STARTING TO DROOP. NOT LIKE BEFORE BUT IF I HAD BRUSHED IT OFF AND LEFT IT FOR FOUR MORE HOURS IN THE 90° SUN IT WOULD'VE BEEN. I GAVE THE GMO'S (BESIDES THE ONE I GOT YESTERDAY EACH A GALLON. I DIDNT WANT TO WATER DURING THE DAY BUT THIS WAS MY BEST OPTION. I GAVE THE TOASTED TOFFY A GALLON AND THE 2 EVENT HORIZONS EACH GOT HALF A GALLON, AS WELL AS THE SHERB PIE WHICH GOT HALF A GALLON. I DECIDED TO DO THIS BECAUSE SOME PLANTS USE MORE WATER THAN OTHERS. BEFORE ACTUALLY GOING OVER I CONSULTED MY PREVIOS DIARIES. I HAD THIS SANE PROBLEM LAST YEAR ON THE SAME WEEK OF THE MONTH! THATS WHAT MADE ME TRUST MY INTUITION FULLY. I LEARNED FROM THE MISTAKE OF LAST YEAR. THINGS ARE GOING GOOD. IM STARTING NUTES SOON AND I NEED TO SPEAY FOR BT BUT DONT KNOW IF IT WILL BE TONIGHT.
7/29 Apparently my intuition worked out well. Plants looked great this morning. I may feed today. I defoliated a bit and watered the 10g with a half gallon and gave another half gallon to the gmo on the end that dries out fastest and that I didn't water yesterday. I think I've got the watering down. Now I need to start nutes and spray bt. Need to wait for the rain first though. Suppised to get minor showers the next couple days. I'm gonna try to get the trellis up too.
WENT BACK A LITTPE AFTER FOUR. HUMiDITY WAS 100% AND IT WAS RAINING VERY LIGHTLY. I MEAN AS LITTLE AS IT CAN POSSIBLY RAIN. ALMOST LIKE WHAT IT FEELS LIKE WITH THOSE MISTING FANS IF YOU STAND BACK A WAYS. I DIDN'T WATER. PLANTS WERE LOOKING GREAT! I DID SOME DEFOLIATION AND CAN TELL I NEED TO START NUTES. I CAN SEE SOME SLIGHT DEFICIENCIES IN BIG OLDER LEAVES. SOME SMALL INTERIOR LEAVES YELLOWED. NOT MANY. GRANTED THEY ARE STARTING TO FLOWER. I'LL PLAN ON FEEDING TOMORROW. THE NEXT FEW DAYS IS SUPPISED TO BE SHOWERS. I DOUBT IT WILL GIVE MY BIG GIRLS ALL THEY NEED BUT IT WILL BE A GOOD START. I DID A VIDEO BUT ITS RATHER LONG SO I CANT UPLOAD IT HERE. ITS COOL WATCHING HOW DIFFERENT THE DIFFERENT STRAINS GROW. STILL HAVE A BUNCH OF SHIT TO DO. IT WILL GET DONE THIS WEEK.
7/30 I held off watering today due to a supposed storm and rain we were supposed to be getting. I had early doctors appointments. I got back around 11 and the bags seemed light. After consulting last years diary I saw that I am underwatering. The root system weighs a lot! We haven't got the hundredths of an inch of rain but we got some sun. It's over cast now. I was there working for a few hours. I watered most a gallon. All the gmo's got a gallon. I gave the two event horizons about two thirds a gallon. About the same with the toasted toffy and the sherb pie. About 3/4 of a gallon as they seemed to have a little weight left. Looking at last years diary there were plants I was giving two gallons at a time in a 20 gal bag so I've been u Der watering a bit. I've caught it now and adjusted. I'm not losing leaves at the pace I have in the past. Even though some are in flower. I think I'm getting better. I fed for the first time today. Each plant got 1.75 pints. Except the 10gallon which got half the powerade bottle and the 5gal which got a qtr. By the time I left the plants were standing up nice and tall and looking amazing. Now I just need to apply bt and secondary supports.
7/31 Another eight day week. I'll have to do six days next week. Everything looked amazing this morning. I'm seeing less pest damage. Watering and feeding was the right move. Now I just have a little rearranging to do, add supports and spray if I decide to.
Likes
29
Share


@Ganja_Victoria_Aus
Follow
Due to the timer being wrong, I slow the flowering time. Hopefully, she will speed up soon. They love hot temperatures 🤒

Likes
3
Share


@Therbalist
Follow
Beast of a strain I'm sure its a female if it's not I'll be gutted!
Waiting for sex to show before applying home made STS solution.
Great branching and perfect two inch nodal spacing between branches.
Seems to be happy whatever I feed it hasn't shown any signs of deficiency or excess of nutrients! I reckon her kids will survive world war three 😉☢️
Likes
14
Share

@Bread_n_Buds
Follow
Our Black Runtz by Zamnesia has reached 16 buds. I'm growing them a little more to make sure they don't go into flowering with small brunches but we're almost there, a few days and they'll go into flowering.
She's a plant with a low internodal distance, they're not the most suitable for topping due to the slow response of the mini brunches but you just need to let them grow a little and not go into flowering straight away to get an excellent result anyway.
As a general rule but very general plants with a low internodal distance are less suitable for the application of the techniques unlike plants with a wide internodal distance which are very easy to handle, they grow more slowly and can reach excellent dimensions even if worked with techniques that keep them low.
The Topping worked very very well the plant at the moment of topping went slightly into overfertilization due to the evident slowdown in growth, so I slowed down the fertilizer for growth but without making her go into crisis we are starting to give fertilizer again. When topping is a delicate moment it is probably better to do what I explain below with this plant I managed to keep myself more balanced the others for a week were in quite evident over.
The ideal when topping repeatedly is probably to start with a soil fertilized with gradual release or in fact start preparing the soil for a period that is at least enough for the vegetative phase at most by adding a bit of alga grow which alone I must admit gives me some problems at least in this case if the plant grows straight much less indeed nothing.
We are always using soil, feeding and all the recommended additives from Plagron 100% organic, we have only lowered the amount of grow in this topping phase for the reasons mentioned above.
---- Decide on the right soil and calculate your fertilizer sheet based on the soil on the official website.
-- www.plagron.com
Try a seed of this strain that drives us crazy..
-------- https://www.zamnesia.io/en/11159-zamnesia-seeds-black-runtz.html
Zamnesia Description // Black Runtz comes from a truly legendary genetic pool. Our breeders used three modern classics from the United States to create this strain: Zkittlez, Gelato, and Runtz. With 20% THC and flavors of grapes and berries, Zkittlez passed on her delicious flavors and relaxing effects. Gelato contributed to Black Runtz's immense flavor profile by passing on high concentrations of the terpenes limonene and humulene. Finally, Black Runtz inherited the high potency of the original Runtz, a strain with a respectable 21% THC. The end result of this 3-way cross is a strain with 55% indica genetics and 45% sativa. Black Runtz boasts rapid flowering times, high potency, and contrasting yet balanced terpenes that supports its delicious flavor profile.
All the best that mother nature can offer is on ---- www.zamnesia.com
Likes
38
Share


@Hellhazard
Follow
Day42 of flower.
Buds are still filling in slowly. She is really starting to smell now, like burnt sugar. She is getting heavier and I will have to put some bamboo sticks in this week to hold her upright. I really love the structure of the buds and how the stalks look like striped straws.
Everything seems normal.....

Likes
12
Share


@StonedandSteady
Follow
AutoBlueberry 9th w/ 4th W/ Flower breed by #DivineSeeds #DivineSeedsSquad #DivineSeedsBreedingCompany
Flowering out and her Smells are already getting Stronger of Gasy and Candied Blueberries! I recently Trained down her branches to expose more Bud sites and Removed the Biggest fan leaves to expose the Bud site's to this Glorious #OsreeQB1000w Full Spectrum Grow Light! I've also Super Cropped, Topped um, Defoliated, Leaf tucked, and Implement the 3D's method like my Broski #TigerfishOrganics to remove the Dead, Dying and Diseased leaves!
Origin:Afghani/Thai
Type:50% Indica/ 40% Sativa/ 10% Ruderalis
Flowering:56 days
THC:22%
Harvest:400-550 g/m2
Height:110-150 cm
They were Growing under the #Growatt600w and in my #TopoLite 24×24×48 Grow Tent but I've Upgraded and Updated it to my #OsreeQB100W I'm also using #TNBNaturals #TheEnhancer Co2 Despersal Canister and using thier Ph⬆️⬇️ for my Decolinated Tap Water!
Green and Growing Up Great! She's Growing into her 4th week of Flower! She's Growing in my special blend of ProMix potting mix, a 1/2 bag of Earthworm castings and 2 light handfuls of Diatomaceous Earth mixed Up well for before transplanted! Diatomaceous Earth: Diatomaceous earth is made from the fossilized remains of tiny, aquatic organisms called diatoms. Their skeletons are made of a natural substance called silica. WHAT IS DIATOMACEOUS EARTH?
In a nutshell, DE comes from the fossilised remains of small marine organisms called diatoms. Over a 30 million year period, these hard-shelled algae collected on the bottom of bodies of water, eventually forming into a type of sedimentary rock. Fast forwarding, it wasn’t until around 1836 that a German peasant Peter Kasten discovered the ivory-coloured, powdery substance while drilling a well in northern Germany. Ever since, the usefulness of DE for multiple purposes, including industrial and horticultural applications, has been well-reported. Just sprinkle some diatomaceous earth on top of your soil and watch mother nature's secret weapon work its magic.CONDITIONS THE SOIL
When it comes to growing cannabis, everyone strives to provide the best soil to grow the best plants—but there’s always a way to make it even better. Making the soil a better medium is called soil conditioning, which is exactly what diatomaceous earth does. It works by improving the retention of moisture in your potting soil, holding a large amount of fluid and drying at a rate that’s much slower. This natural soil additive also helps to retain nutrients and allows for better oxygenation of the substrate. NATURALLY CONTROLS PESTS
DE is an all-natural, safe-to-use substance that doesn’t harm the cannabis plant with toxic chemicals. The nature of diatomaceous earth makes it useful against most types of insect infestation you might be experiencing; and unlike chemical insecticides, insects can’t develop a resistance to the effects of DE. So once they’re gone, they’re gone for good. DE is an abrasive. and when used as an insecticide, it gradually scrapes away an insect’s exoskeleton, absorbs the fluids, and dehydrates insects and other critters to eventual death. IMPROVES PLANT STABILITY
When using DE in your soil, it can be especially beneficial as it frees up nutrients so that they are made available to the plants as needed. This works via the silica content of DE being absorbed into the plant tissue, which helps improve the plant’s ability to respond and receive more nutrients as DE activates. This in turn results in greater yields and better stability under small pH fluctuations!
https://divineseeds.net/
https://instagram.com/divine.seeds?igshid=osxe2v7en33v https://divineseeds.net/
Thanks Again to All my Friends, Family's, Teams, Sponsors, Followers and Subscribers!!! Your Genetics are Merry Magnificent, Mega Marvelous and Mighty Medical! Love um!!! I really Can't stress enough how Thankful and Grateful I am of All of you and what you've Shared with Us! Means the World!!! It's definitely a Pleasure being able to Grow with these Phenomenal Grow Lights! Please Enjoy! BudBrothers4-Life! Cheers Famz!!! Much Props and Much Topz!💯🔥 #Osree #GrowStarStore #Growatt #TNBNaturals #TNBTeam #GrowYourOwn #Bliss
https://instagram.com/osree.light?utm_medium=copy_link
https://instagram.com/as420.ca?igshid=1f116alw054wp
The Grow Bags: https://www.as420
https://instagram.com/tigerfish_organics?utm_medium=copy_link
https://www.facebook.com/Tigerfishorganic/
#TigerfishOrganics YouTube Channel Link: https://youtube.com/channel/UC6OSXTda1JYaVNoCxdcYqIg

Likes
7
Share


@Jolliejointz
Follow
21 branches over 40 bud sites only to be handled with nylon gloves. Bent the top over slightly to allow better distance from the light she is much taller than I thought I allowed for. Not complaining lol. I stopped adding the fast grow a while back it just never stayed deleted. Also added an extra light down below to give light to the bottom 45watt led at 30 cm away from closest branch. End of next week I will be adding extreme boost and removing the monster bloom.
