By continuing to use the website or clicking Accept you consent to our cookies and personal data policy and confirm that you are at least 18 year old. For details please see Privacy Policy and Terms
Accept
Likes
26
Share


@Sickone
Follow
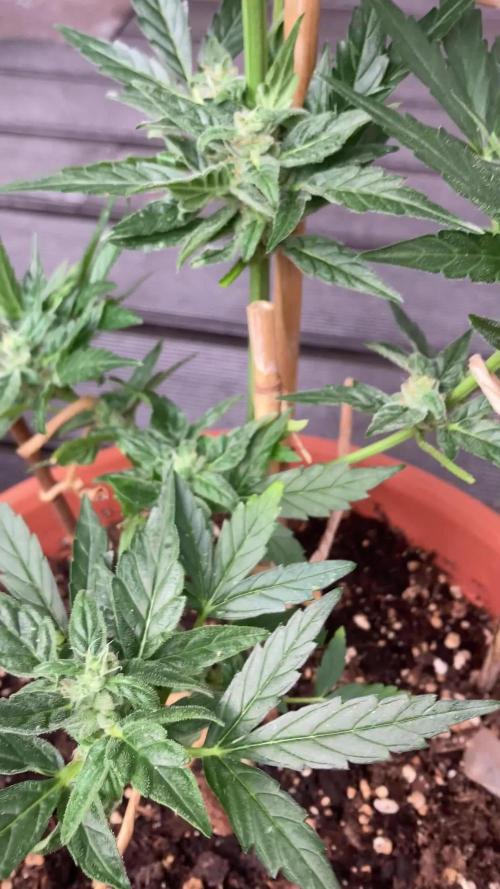
Die 1. Pflanze wurde am Tag 68. geerntet da viele Blätter aufgrund des zu nahen lampenabstand gelitten haben und ich mir unsicher war ob es klug ist sie noch länger zu ziehen.
Gesagt getan die Pflanze wurde geerntet und kopfüber in den Schrank gehangen. Gute 7 Tage später habe ich sie weiter verarbeitet ( Getrimmt ) und die fertigen Blüten ab in die Gläser zum Aushärten gegeben.
Smoke Bericht folgt sobald alles fertig ist.

Likes
10
Share


@Greenbum
Follow
#1 is beginning to hermie I think, will watch to see if I can save but if it gets out of hand then chop city.
Pulled off any pollen sacks I saw but they don't seem to be getting out of hand. I'm sure I'll miss a few but I'll take my chances.
Temps good, ph drop was fixed and staying stable around 6.2. Flower development is good but I need to get a little more air flow. I trim about 12 (or less) leaves every 10 days. Overall goal is to achieve light penatration with 13in from the tops.
Working in it over the week...

Likes
7
Share

@MaxWax
Follow
The plant is really small hopefully there are a few grams xD and now it is even infested towards the end and has to go out in quarantine lol

Likes
25
Share


@Grey_Wolf
Follow
Who Am I ???
MSNL seeds Amnesia Fast
4th July 2021
Hi there everybody , I hope you are all staying safe and well where ever you are in this World we live in 😃
The Amnesia Fast is still handling the Winter weather really well with no signs of damage or undue stress 👊
I gave her some Guano pellets and Worm castings Liquid ( see above video )
I've also introduced a reversed sex cutting of the Australian deadhead which I hope will eventuate into some
Amnesia x ADH fem seeds to play with later on. 😎
I still am not keen on re erecting my grow tent and lights etc for atleast another 2 weeks just incase I get an unwanted visit
from the Five0 😕
That is all I have for this weeks update , check out MSNL seeds great range and Thanks for stopping by 👍

Likes
4
Share


@Coopmc
Follow
Ya buddie got a cut of this to throw in with FruitWalker 50/50 I’ll be reversexig for pollen!
Hell yes😍😍😍
Likes
20
Share


@Hawkbo
Follow
This is doing good just swelling up. Its gunna have some fat buds it looks like. Some of these never fully recovered from being stunted from the cold. I added some microbe life photosynthesis plus to the mix.


Likes
12
Share


@Eauderay
Follow
Slowly but surely seems to be my motto lately lol but that is exactly what it is! Just plain water and peace...until I top her ♡
Likes
2
Share


@Mighty_Monaco
Follow
The smaller one went outdoors, into the garden of a friend.
All good. Some yelowish leaves, some leaves with spots, nothing serious.
Watering almost every second day.
Giving much more water than last years grow, but i have a much stronger pump for air. And the filter ist not installed yet.


Likes
16
Share


@GreenMunchkin
Follow
Alright grow cycle, mistakes, improvements, etc...
She did stay in veg for too long, her growth was slow and not the best and so she took quite long, next time i'll be there from the beginning so I can take care of her throughout.
But her growth is really fun. It is a tall growing sativa with fairly tight noding when trained accordingly, producing long filled colas. The buds grow fairly dense and fluffly but do air out a little when dried. Trichome production was pretty impressive as well as terpene production.
She had thrips since her early days but did not seem to mind them at all. I did spray them initially but once flower started I stopped. I believe predatory mites might have been feeding on the pupae in the soil, if that is what this specific species of thrips did, the reason I say that is I could never see adults only larvae. Whatever the case maybe they were there but the population never really increased.
Something I did not mention during the grow is that those plants were played music during the days, music that is apparently developed for plants.
The 10L pot was WAY too small for a true sustainable living organic and to provide enough space for the plant, that was a mistake, I'd say a 20L would be the bare minimum and still. The bigger the better.
The hempy transfer did not hurt the plant and I believe even helped to some extent, BUT, I am still running test on the subject and so can't confirm anything, here are my observations
Roots did not colonize the perlite, a little on top and the sides but that was it, I was expecting to see a big root mass in there.
I believe hempy are great for salt fert as it hold a soup of nutes where the plant can feed from since the coco only holds very little
Whereas in nature most nutrient are in the top soil where the highest amount of decomposition happens, this is where the highest microbial activity happens and so where the plant will find food. Living organic is trying to reproduce nature and so there is no need for the plant's roots to gather at the bottom of the pot. Although it could have potentially provided the plant access to a larger amount of water and possibly more oxygenation of the pot. Those are all theories, please speak up if you have other proofs.
In conclusion , unless i get proven otherwise by someone or my latest running experiment , I will not be using hempies again as I believe it brings more complication and issues than a simple fabric pot.
The lights, The 600w at the start was good, then I decided to add a 400w...😂 That was completely overkill and not necessary. Waste of electricity. And they started suffering from too much light it seems at some point, I raised the light by a good 30 cm and they were fine.
600 is more than enough.
I am happy about how the soil performed but it has room for improvements.
As for the watering technique I have been watering large ammount every few days, next time I will be giving constant small amount of water each day and a soak every week or so, I believe the soil might perform better under those conditions.
She was also an easy plant to harvest whit her long colas which had very little foliage, I do trim in excess as I like my buds extra clean but the buds are not excessively bushy.
The trims were use to make some bubble hash, around 100g of wet trims yielded around 1.5-2g of bubble hash.
I did add a negative effect but only because it wouldn't give me a smile otherwise, but to be honnest it barely dries your mouth.
The soil is going to be recycled and reused in a next grow.
I can't think of anything else at the moment but if you have any question don't hesitate.
Likes
58
Share


@MadeInGermany
Follow
Flowering day 25
since time change
to 12/12 h.
Hey guys :-) .
The ladies are developing more and more beautiful and fat week after week 😊.
The tent fills up perfectly 👌.
I removed the bottom shoots to allow the energy to flow to the top buds.
This week it was watered 3 times with 1.3 l each (nutrients see table above)
Otherwise everything was cleaned and checked.
Have fun and stay healthy 💚🙏🏻
👇🏼👇🏼👇🏼👇🏼👇🏼👇🏼👇🏼👇🏼👇🏼👇🏼👇🏼👇🏼
You can buy this Nutrients at :
https://greenbuzzliquids.com/en/shop/
With the discount code: Made_in_Germany you get a discount of 15% on all products from an order value of 100 euros.
👇🏼👇🏼👇🏼👇🏼👇🏼👇🏼👇🏼👇🏼👇🏼👇🏼👇🏼👇🏼
You can buy this strain at :
https://www.thegratefulseeds.com/shop/feminized-seeds/limited-edition/blue-javaz/
Water 💧 💧💧
Osmosis water mixed with normal water (24 hours stale that the chlorine evaporates) to 0.2 EC. Add Cal / Mag to 0.4 Ec Ph with Organic Ph - to 5.8 - 6.5
MadeInGermany

Processing
Likes
19
Share


@Mission420
Follow
Another good week without any worries so far, crossing my finger. Although watching the time lapse, I see them sag during certain times, and then sprout other times. I am trying to watch when I feed them and to only do it when the leaves start to droop. For instance, as I am writing this, I see on my live cam they seem to be doing well, I have been checking the PH most times when I water them, but sometimes I just trigger the pump remotely without testing as it was good the last time I checked it.
I can see them starting to develop buds, and hopefully they start to thicken up this week. According to my chart, I will be dropping the Medi One to 1.5 ml/l this week, and continue with 5 ml/l for the massive bloom. I also had to raise up my light a bit, and hopefully they don't get much taller as I only have a couple of inches left on the cord.

Likes
7
Share


@hooolian
Follow
18/02: The plants sugar leaves are starting to turn yellow being a good sign they are nearly done. Added more cable ties as again the colas are getting too heavy for the actual stalks. Should be a good harvest. Few more days on the nutes then to flush.

Likes
17
Share


@m0use
Follow
This was a fun project that was a few years in the making and a year later to see if they would last a season for this upload to happen. Before any of this I would bike aorund town grabbing up all the old Ikea solid pine bed slats that I could find and storing them in the basement. I have a lot of wood down there, any size worked as long as I have enough of them. The hot days to find them were the first and last of the months because that's when people where moving in/out. I also kept an eye on the free section on local online classifieds as well. The entire purpose of this was to recycle as much off the streets as I could before buying anything to finalize the project. In the end I only bought sealer, screws and some takeaway/beers. All the wood was 100% free and salvaged off the streets of Toronto saving it from the dumpster bin.
After collecting all the slats for about 2 years I was playing aorund with them on how I wanted to make this work. I had previously done a little project like this before but I messed it up and the boxes where crap. did not last longer then 2 seasons, they where thin and shallow as well could not grow much of anything in them. I Was talking to my friend who is renovating their house and we brainstormed some ideas on the boxes, I found some designs I liked online and said lets make something like this out of what I have here. We tossed out a few of the design features when looking at them as it would have been wasted wood and extra work not needed. If I had more wood them maybe it could have been an option but simple was the name of the game. They taught me what I needed to know like how the miter saw and sander worked, plus all the other tools I was using. They did help out with a table saw and creating the triangle support joints in the corners, They used some pine left overs they had while making a staircase indoors. I did not feel up to the task of using a table saw given all the relatives I know who have lost a finger to them.
In the end we decided the design would be three boards high and take an alternating pattern on corners. layer one short, layer 2 long, layer 3 short. Went with a galvanized and painted deck screw so it can take the weathering. Ran into some problems like making everything level as some of the boards were warped and other ones had undesired aspects like knots and tacky sticker goo I could not remove. So I used them for the base that will not been seen so much. Clamped everything down and called it a day.
Once it was all done and over with, I then brought them back home from my buddies work garage and started to seal them. I went with a boiled linseed oil as its a food safe option should the wood degrade into the soil I will plant in them. I will need to reapply it to the boxes year after year but the main coat is the most important one and I put it on 3 layers with a good dry in between coats. the inside of the boxes that where coated did not degrade at all as the sun did not hit them so it will not need a new coat just the outside. Overall the end result was very impressive for myself, I've never taken a woodworking class ever and It was a near perfect outcome for me. Heavy Duty Planter Boxes for all my gardening needs. I made a last min decision to add in a plastic liner to preserve the wood even longer and stapled that into the frame. it has held up quite well and may need replacing end of 2nd or 3rd year out in the sun. Used a thick moisture wrap plastic with UV protectors in its formula.
Lets see what I can grow in them this year!
m0use's haus of projects - garden box edition
Likes
42
Share


@Canna96
Follow
Hey now....This week went pretty good, I transplanted both seedlings from solo cups to 3.4 gallon airpots on day 16, and I also began high frequency fertigation that same day. I am running lights from 12AM to 6PM, and I feed at lights on and every 5 hours after that. Nutes are Silica, Cal Mag, and Maxi Gro with an EC of about 1.2 and a PH of 5.9ish. I am planning to top them both this week probably around day 25ish to the 3rd node, once I feel the roots are strong enough to bounce back instantaneously to the topping. I will start training the mainline within 24-48 hours of the topping as long as they respond well to the topping. I am still only running a 100 Watt Led light for them, but I am thinking about running a 400watt Super Metal Halide Bulb just to build the manifold, then switch over to LED's for flower. I did squeeze some of the bubble hash from the first planet of the grapses run, and all I can say is wow.....it truly tastes amazing and will absolutely put someone on all fours. So far so good with these two little ladies, I hope everyone is having a great weekend, thanks for stopping by and Blaze On!!!

Likes
7
Share

@Trinidad
Follow
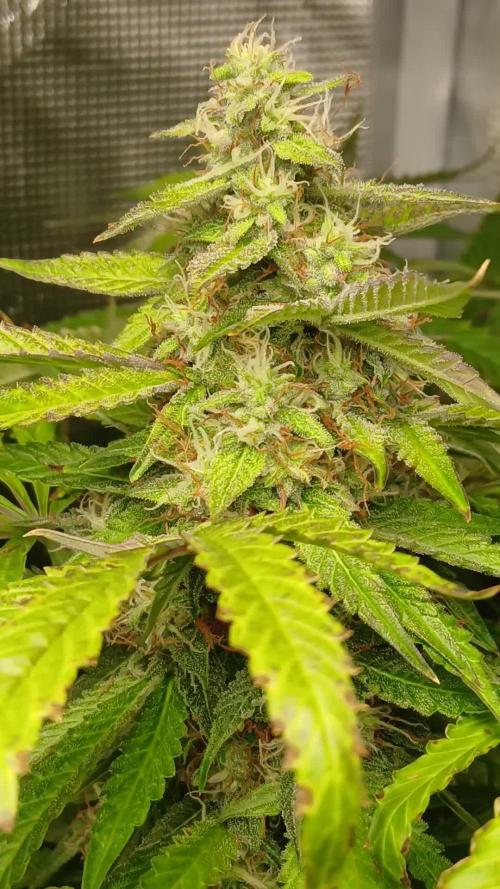
Day 67. Buds have become fat. Trichomes ah becoming visible clear. Fresh reservoir change out yesterday.
Likes
12
Share


@NorthEuropeanGrower
Follow
White Widow looks realy good. I expect that I can harvest her in august. Northern Lights looks good too, but seems to be flowering much slower then White Widow. Blueberry Ghost OG (it is HUGE already) and Kali AK still won't start flowering and I don't know why.


Likes
29
Share


@Lazuli
Follow
This strain has huge fat buds everywhere there was not one popcorn bud sooo i think this is a keeper

Likes
45
Share


@Le_Duc_Du_Bud
Follow
Salut a tous ✌️🌱
Voici la 3 ème semaine de croissance, tous ce porte a merveille, je vais laisser faire dame nature 🍁🍁🍁
Les nutri , elles les encaissent super bien .
La lumière, de même 😁
Je suis pressé de voir la suite ✌️😘
Vous les trouvez belle 👍