By continuing to use the website or clicking Accept you consent to our cookies and personal data policy and confirm that you are at least 18 year old. For details please see Privacy Policy and Terms
Accept
Likes
Comments
Share


@Kaia108
Follow
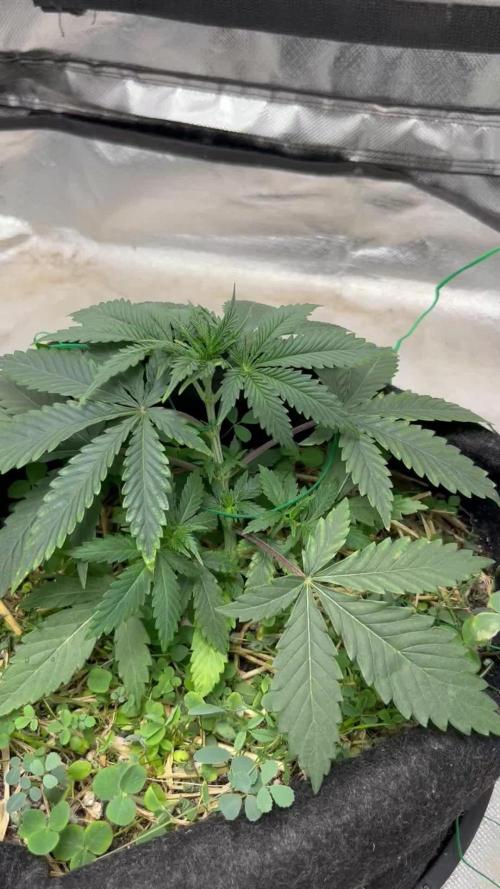
You can see the nute burn here from the first and only feeding earlier in the grow. Just a tad too much fertilizer.


Likes
94
Share


@love_2_grow
Follow
We're halfway through flower, and the girls are trucking along without much help from me.
This week's only exciting thing was making compost tea (worm castings, insect frass, kelp, rock dust, basalt, biochar, molasses, and LAB) for the girls (and to kickstart my new veggie soil.)
The tent has more color changes, and considering that they are clones, it's fascinating to see the differences between each plant.
DLI: 42
UV: 2,5 hours per day

Likes
6
Share


@Nefelibata
Follow
Dia 43 - 09/12 - REGA 1,5 lts - Somente água. Folhas da planta 1 com sintomas de queimadura por luz. Pontas laterais das folhas apontando pra cima e amarelando.
Dia 44 - 10/12 - Planta 1 com diversas folhas amarelando. Sintomas do excesso de luz parecem ter sido contidos. Pontas das folhas parecem menos pra cima. Planta 2 com 3 folhas fan de baixo amarelando.
Rega com 1 litro água e dose semanal de flowermind 9ml, em vista do q aparenta ser deficiências na planta 2 com folhas inferiores amarelando.
Dia 45 - 11/12 - Nada. Duas folhas amarelas caíram da planta 2. Parece q a deficiência foi contida.
Dia 46 - 12/12 - Rega 1,5 lts com 15mls de Bokashi Frutas PlantaeFert.
Fiz extensão na QB Figolite e tirei o driver do grow.
Dia 47 - 13/12 - nada.
Dia 48 - 14/12 - Rega 1,5lts, com 15ml de PlantaeFert Enraizador Algas Marinhas;
Dia 49 - 15/12 - Nada.

Likes
24
Share


@Lycheegrow
Follow
They didn't show any transplant shock after the transplant to their final pots. They do all show increasingly bad signs of calcium deficiency though. I'm going to give them a feed consisting of at least 0.5 ec of calmag in the next week.
At the end of the week, I moved them to the flower tent in preparation of flipping them. They are now on a 18/6 light schedule. First days didn't look too great, seems like the humidity in the room was off.

Processing
Likes
23
Share


@TOTEM
Follow
Big leaves, no toppings, LST, or any other training. Just removed some lower branches. She’s just started flowering, but the growth rate of the flowers is high!
Likes
12
Share


@CanadianFillmore
Follow
Week 3 begins for LSD and Green Crack. Both ladies are looking good, but had some small signs of deficiency. Added big bud coco and upped feeding another liter (split feed day 1 & day 5 of each week), hopefully this will help resolve the deficiencies.
Thanks for stopping by growfessors 👽🌳💚

Processing
Likes
43
Share


@Jack_Greenstalk
Follow
the left "nemo" is much further along than "v" on the right. began tapering back on both nutrients, after this last compost tea feed nemo is getting flushed, just RO water and finish by heavy 16. V needs another week to develop then 2 weeks to flush and finish. will probably chop nemp im 2 weeks between day 67-70 of flower, based on trichome color. after initial harvest on nemos tops im going to re-weave "v" tops thru scrog fpr better airflow, light use and allow them to fill and finish with the lower buds of nemo at probably day 77 or so, its slower rolling, much more haze pheno, both leaf shape, bud structure and smell. Nemo is much more blueberry, finishing sooner, smells like blueberry candy and has wider fan leafs.


Likes
30
Share


@BC_Green
Follow
It has been another amazing week of the plants growing. I have been watching as the Fruity Freak leaves become progressively more fern-like, and ornamental as a result!
Based on my Banizzle grows, I knew I needed to understand plant nutrients in a more meaningful way if I wanted these plants to thrive. So, I decided to get a soil test (see Ref. 1 below on how to perform a test) to understand what nutrients my plants needed. The report I received advised that I needed to add 200 lbs/acre of nitrogen, 150 lbs/acre of phosphorus, and 190 lbs/acre of potassium (see picture labeled Pic.1 (FYI you can't see these images unless you login to growdiaries)).
I then researched what to do with my results (Ref. 2 helped), and I figured out that my nutrient needs of 200-150-190 fall close to a 2-1-2 ratio. I then looked at different types of organic fertilizers (see Ref. 3 and Ref. 4) and considered that I already had a 3-10-5 fertilizer (Vermibloom) on hand. I discovered Dr Earth’s Alfalfa Meal is 2-1-2 and includes beneficial bacteria and mycorrhizae (to promote healthy plant growth and disease resistance). However, I knew I would be low on nitrogen if I only used those two fertilizers. Therefore, I decided to buy some blood meal (12-0-0). I also liked that blood meal is more fast acting while the other two are more moderate.
I hunted around for a solid fertilizer calculator and found an amazing tool from the University of Georgia Extension (Ref. 5). I entered all three fertilizers into the calculator, and it kicked out the exact amount of each fertilizer I needed to apply to 1 square foot (see Pic. 2). As I am using 10-gallon fabric pots (that can hold 1.5 cubic feet, but I put stone on the bottom and there’s space left at the top) I decided to use the one square foot application rate as I can always add more later, but I can’t take it away.
Not only did I want to understand the nutrients I needed, but I also wanted to understand the structure of the soil (as it was not included in my test results). North Dakota State University has a nice page that discusses this (Ref. 6), and I performed a soil ribbon test (see Video 1) based on this information. I determined my soil to be medium textured (which is great), but I have seen occasional water pooling on the surface, suggesting that it may be more of a medium-fine. This means adding peat moss, coco coir, or other amendments might improve drainage (and plant hydration) and allow for roots to grow more easily. In the long run, I plan to use compost to enhance the soil structure and nutrients.
I filled the bottom of my 10-gallon fabric pots with a ½” of pea stone to allow for drainage (Pic. 3). I then partially filled two 5-gallon buckets with topsoil from near where I will plant (but not in an area the roots will reach). I used a digital scale to measure the amount of fertilizers recommended by the calculator (Pic. 4, 5, and 6) and added it to one of the 5-gallon buckets (see Pic. 7). I mixed the fertilizers into the soil as evenly as possible (Pic. 8 and 9). I then poured a two-inch layer of non-fertilized soil, then peat moss, and then fertilized soil (in a roughly 2:1:1 ratio) and blended them together. I repeated this until the pot was full (getting additional soil as needed), and then I repeated the process for the other three pots.
I set the filled fabric pots in my garage (Pic. 10) for two days to allow any upset bugs to flee into my garage instead of my house. I then moved the pots (wrapping them in a contractor garbage bag to prevent making a mess) into the room with the grow light. I placed a board on top of the fabric pots to insulate the plants (in their smaller pots) from the cold soil (Pic. 11). Once the soil in the fabric pots reaches room temperature, I will transplant.
(Ref. 1) This video shows the method I used to take a soil sample. I didn’t have a field to test, so I took four samples from the area where I will eventually plant outdoors and blended them together. I then mailed my soil sample off to the lab, and about a week later, I received an email with a PDF of my results (included with my pictures this week).
https://www.youtube.com/watch?v=N9AwxmFxBwg&t=8s
(Ref. 2) This video from the University of Minnesota Extension (many universities have agriculture extensions that can assist you with soil testing and growing information for your area) discusses what to do with your soil testing results:
https://youtu.be/HYrkcfE62Pg
(Ref. 3) This is a nice article that discusses organic fertilizer solutions:
https://www.grow-it-organically.com/npk-fertilizer.html
(Ref. 4) This article lists the NPK values of many organic fertilizer solutions:
https://www.epicgardening.com/organic-fertilizers/
(Ref. 5) Many websites tout a fertilizer calculator…but this one is hands down the best I have found. If you scroll down to the bottom, you can enter any fertilizer type you want (and the cost, if you want). It will give you the exact blend of multiple fertilizers to solve your nutrient deficiencies (I included a snapshot of the solution I used in my pictures).
https://aesl.ces.uga.edu/soil/fertcalc/
(Ref. 6) This is an excellent article that discusses how to evaluate your soil:
https://www.ndsu.edu/agriculture/extension/publications/evaluating-preparing-and-amending-lawn-and-garden-soil
Likes
17
Share


@Dunk_Junk
Follow
I think she's done!!! She's gone very yellow during the week.
Incredible frost!!
Will be chopping in the next few days.

Likes
10
Share


@prohbusiness
Follow
Darkness was sketchy but glad I did it. Should have cut plant 1 last week. Plant two looks great. Smells like candy. So stoked. Have two mothers and 4 clones ready to go. Clones went into flower earlier then anticipated had to “reveg” them then back into flower so they look funky. Might do a flower diary to show.

Likes
42
Share


@GanjaReaper
Follow
This week I bought some other plants to make sure my neighbourhood doesn't smell like weed when people walk by LOL.
I would really recommend to buy plants like these.
When I open the door to my balcony it now smells different, i don't know for how long since they are not in flowering stage yet, we shall see.
Did some LST and defoliation like I do every week.
Changed plant spots.
This time I had to add more water to my feeding since it is getting hotter outside and my plants take up more because of having more roots and needs.

Likes
26
Share


@GrowInger420
Follow
She grows very slow, i dont know why, the runtz and my revegproject goes good in tje same space.maybe she took bit longer. Have a nice week


Likes
Comments
Share


Processing
Likes
26
Share


@Barakuda
Follow
Hi zusammen , so heute is Tag 43 in der Blüte , die Damen Blüten richtig aus , Knospen Werfern dicker und dickere , wunderbare süßes Düfte, es gibt paar von der unteren Blätter ist gelb oder abgestorben aber ingesamt sie sind super gesund und immer noch alles grün , könnte bis jetzt kein lady bug rein setzen , heute wird gegossen mit water und Honig 💚✌️🏼
Likes
7
Share


@Genussmittel420
Follow
day 3 - hulkberry forms first pollen sac.... might play with the fire and try to get rid of it if it is the only one. not too sadisfyed with RQS automatics yet tbh. :(
day 5 - the other flowers seem to be female, as you can see on the hulkberry picture from today.
Likes
31
Share


@MadeInGermany
Follow
Info:
Unfortunately, I had to find out that my account is used for fake pages in social media.
I am only active here on growdiaries.
I am not on facebook instagram twitter etc All accounts except this one are fake.
Have fun with the update.
Hey everyone ☺️.
This week she made a nice boost.
I have decided not to use any more training and to send them into bloom next week :-).
This week it was poured twice with 1.2 l each.
The tent was cleaned and the humidifier was refilled.
I wish you all a lot of fun with the update.
Stay healthy 🙏🏻
You can buy this Strain at :
www.Zamnesia.com
Type:
Runtz
☝️🏼
Genetics:
Zkittlez x Gelato
👍
Vega lamp: 2 x Todogrow Led
Quantum Board 100 W
💡
Bloom Lamp : 2 x Todogrow Led
Cxb 3590 COB 3500 K 205 W
💡💡☝️🏼
Soil : Bio Bizz Coco
☝️🏼
Nutrients : Green House Seeds Company Powder Feeding Bio
☝️🏼🌱
Water: Osmosis water mixed with normal water (24 hours stale that the chlorine evaporates) to 0.2 EC. Add Cal / Mag to 0.4 Ec Ph with Organic Ph - to 5.8
Likes
28
Share


@Susquihanna
Follow
This week has been sunny, hot and wet. I have not done a thing except to keep an eye on Miss Gorilla Cookies. It has been a hot and rainy week and I did not feed this plant this week. That is why I did not record Ph levels and PPM, etc this week. I have really wanted to give this diary an honest, straight up review of Gorilla Cookies growing in whatever Mother Nature threw her way. She is tall and thin but has a lot of bud growth. I am eager to see how big her buds will get.
One thing that I have not been super pleased with is using Miracle Grow as a nutrient. This outside grow was an experiment using Miracle and not my typical Fox Farm nutrients. At this point in my grow, Miracle Grow needs to remain for garden vegetables and flowers NOT cannibas.
As a result, I have made an Executive Decision and will going add some @Advance Nutrients Jungle Juice for the remainder this grow.
@Hindugod and I have been growing our Gorilla Cookie plants simultaneously and his plants look thicker than mine do. His weather has not been as hard on his plants as I have had here in Virginia. He is also using different nutrients. It is fun watching these 2 Gorilla cookies grow differently and the same:)
Stay tuned to next week and comments are always welcome. Thanks for visiting--susquihanna


