By continuing to use the website or clicking Accept you consent to our cookies and personal data policy and confirm that you are at least 18 year old. For details please see Privacy Policy and Terms
Accept
Likes
Comments
Share


@Theia
Follow
Huge flowers. Super massive with a rich floral nose that has hnts of citrus and grape. It leaves a nice sweet after scent once the main terps drift away. I can't wait for this lady to dry and cure. I opted to leave her with leaf to dry as I want a slower dry on these massive buds. I don't want them to dry to quickly and become too dusty on the grind.😜
Really happy with the harvest. We have 2 clones vegging off this plant which I will take to flower based off the mum. 🌿💚


Likes
6
Share


@MasterKush714
Follow
Hey guys so I'm starting to realize that Autos are probably going to be my best route
from here on out as far as growing, just so much easier to handle and manage lol
but anyways!! These girls are doing great so far, really showing their strengths and almost
no weaknesses, so ill keep updating as we go along, but everything else is listed in the stats.
I'm going to be posting more and more accurate data as well as I'm getting all the right tools
for a proper grow...thanks again guys one love!!! LFG!!!!!!!!!!!!!!


Likes
20
Share


@Meisterwulle
Follow
Moin Leute,
hab vor paar Tagen mit der Ernte der beiden Pflanzen begonnen, war etwa 3 Stunden mit dem Trimmen der beiden Pflanzen beschäftigt. Von der Farbe sind keine großen Auffälligkeiten erkennbar, Standard orange, hell bis dunkelgrüne Buds dabei. Die Größe der Buds variiert von den beiden Pflanzen, die eine eher mit sehr langen aber eher dünneren Headbuds, die andere eher mit breiten und kürzeren Headbuds. Insgesamt kam jetzt circa 640g Nass auf die Waage zusammen (gewogen am darauffolgenden Tag), denke das wird schon eine ganz gute Ausbeute. Im Nachhinein hätte ich schon eine Woche früher ernten können: Die trichome sind schon an manchen Stellen sehr bernsteinfarben gewesen (siehe Bilder). Auch musste ich ein paar Stellen aufgrund von Schimmel wegschneiden (denke das lag daran, dass manche Triebe zu nah an der Zeltwand lagen und aufgrund des wechselhaften Klimas insgesamt). Insgesamt bin ich natürlich sehr zufrieden mit dem Grow, ich konnte einiges an Erfahrung sammeln und werde diese auch für weitere Grows nutzen.
Zurzeit trocknen die beiden im Zelt mit aufgehängtem Trockennetz bei etwa 23 grad und zwischen 55-60 RH. Denke in einer Woche werden diese schon bereit für die Gläser sein, und dann kann man schon mal ein wenig naschen ;)
Ich danke nochmals dem Sponsor Dutch Passion für die Gelegenheit, bei diesem Contest dabei gewesen zu sein. Ich bin mit dem Strain sehr zufrieden - es gab kaum Komplikationen, die Pflanzen waren relativ resistent und das Wachstum ziemlich schnell.
Ein endgültiges Review werde ich erst nach dem Tasting machen können (um ehrlich zu sein hatte ich mir schon vor ner Woche mal einen Trieb abgeknapst und schon probiert, ist aber natürlich nicht ganz repräsentativ für den Grow - war aber mega :P).
Weiter gehts für mich erst mal mit den zwei Stecklingen von den Pflanzen und der dritten Pflanze, die anfangs im Zelt war - diese ist draußen in die reveg gegangen und wird - nachdem die Pflanzen im Zelt trocken sind - zusammen mit den Stecklingen in die Blüte geschickt.
Auch möchte ich jedem nochmal danken der dieses Diary supported und mich auf diesem Weg unterstützt - ich bin sehr froh Teil dieser Community zu sein, der gegenseitige Austausch ist wirklich super und alle sind sehr freundlich :)
Ich wünsche euch ein schönes Wochenende und ich melde mich zum smoke review wieder.
LG Wulle 😻🏻.
Edit:
Die Buds waren jetzt ca. einen Monat in den Gläsern und melde mich damit zum smoke Review :) Insgesamt ein sehr nices high, je nachdem, wie man an die Sache rangeht und grade mit dem Mindset unterwegs ist, fühlt man sich auch dementsprechend. Für Partys gut geeignet, man ist gut gelaunt, locker am dancen und auch noch recht kommunikativ (aber keinen Laberflash ;)) Zum Zocken oder einfach mit seinen Freundenabzuhängeb auch genau richtig Der etwas süsslicher Geschmack erinnert, je nach Phenotyp, entweder an Zitrone (Pflanze #1) oder etwas cremiger aber dennoch fruchtig an Gelato-Vibes (Pflanze #3). Zu Pflanze #2 kann ich bisher noch kein Review abgeben, da ich sie erst heute in die Gläsern getan habe. Und ja - sie hatte wirklich noch geschafft etwas abzuwerfen haha Die Buds sind jedoch sehr klein und insgesamt denke ich nicht, dass sie viel abgeworfen hat, aber ich wollte sie nicht aufgeben, nachdem sie zweimal in der reveg war :P Von den Pflanzen #1 und #3 hatte ich auch noch Steckis gezogen - diese sind auch in etwa 2 Wochen erntereif. Diese sind aber nicht mehr Teil von diesem Diary, denke das würde dann alles zu umfangreich werden. Nichtsdestotrotz da auch noch mal die Bestu00e4tigung, dass auch das (bisher) gut geklappt hat. Falls ich noch mal in dieses Diary schaue oder ihr einen kleinen Tipp haben wollt: Steckling eine Woche in ein Glas Wasser geben, danach die abgeschnittene Stelle in Zimt tunken, und dann direkt in die Erde - hat bei allen Stecklingen wunderbar funktioniert. :PDas wars soweit mit dem Diary, wünsche euch noch viel Spaß und viel Erfolg mit eurem Grow! Noch mal ein großes Danke an jeden, der mich supportet hat und dem Diary folgt. Zudem danke ich Dutch Passion für das Sponsoring und die Möglichkeit bei dem Cup mitzumachen! Schaut dort gerne mal vorbei, die Sorte kann ich definitiv empfehlen! (Unbezahlte Werbung, persönliche Empfehlung :))

Likes
175
Share


@love_2_grow
Follow
Day 36
First day of the final week of vegetation. Originally I was planning on vegging another few weeks but since the right girl already has a bigger bush than a 70s pornstar I'll flip soon, before space will be an issue. Preferably I'd veg the left girl longer as she is still lagging in size but it's too big of a mission to set up my second tent and move her over there.
Super easy day today, all I did was to give the right girl 3 liters of pH 6.1 water as well as tightening a few LST wires.
Day 37
All I did today was to tighten some LST wires, removing some more leaves down low on the plants, and watered the girls with pH 6.6 water. The left girl got around 2 liters and the right one only got a liter since she wasn't all that dry considering that she was watered yesterday. I also started brewing some compost tea to feed to the girls tomorrow. I used the same recipe as previously: worm castings, rock dust, biochar, lime, bentonite, neem meal, kelp meal, and some molasses.
Day 38
Open the tent today and was met by a surprise - one of the tops on the left girl had broken off. I tightened the LST wires yesterday and all was ok when I closed up the tent but I guess that I had tightened a bit too much so the top eventually broke. Sigh. Wasn't planning on topping again this week but yeah, gotta roll with it. Maybe I move one of the girls to the second tent after all. We'll see.
All I did in the tent today was to feed the girls some compost tea. Each girl got around 0.5-liter tea as a foliar spray and then an additional 2.5 liters in the pot. True to form I naturally forgot to pH the tea. No idea why I always seem to forget to pH my compost tea but I really should make an effort to remember it next time.
Day 39
All I did today was to give the right girl 3 liters of pH 6.6 water. She is so much bigger than the small plant so she drinks a lot more. Currently, I'm watering around 10% of the pot volume per day.
I'm pretty sure I will move out the petite girl and put her in my small drying tent and keep the right beast in my main tent as I'm kinda curious to see the yield I will get from her when she can spread out properly. I have already ordered another grow light and it should arrive tomorrow.
Day 40
Today was a busy day in the tent as one of the girls moved out to her new home. Before I go into details, I should take a step back and explain my setup.
I have this tiny tent that is 40x40x120 cm big (16x16x48 inches) that I use as a drying tent. It has a circulation fan, an extraction fan, a carbon filter, a temp/humidity monitor, and an inkbird humidity controller to control everything.
I have been considering turning it into a small grow tent to fool around and see what I can grow in such a small space. I've always been fascinated by small challenges, to see what you can accomplish within strictly set (and small!) boundaries — both in size and in budget.
I was planning on setting up this tent after the summer, but as I'm running out of space in my main tent, it seems like a good idea to do it now instead.
The only thing the tent lacks to start growing is a light, and I already have a ViparSpectra P600 light, but it is currently used for my chilis and tomatoes while they are waiting to move outside.
So I bought a new low-budget light to use with the veggies and move in the ViparSpectra light into the tent. The P600 is also a budget light, but I'm hopeful that it will still work well in such a small space. After putting in the light in the tent and measuring the PAR level, it looks like the ViparSpectra is more than up to the challenge as I had to dim the light not to fry the canopy below.
The entire build with everything in it (tent, light, fans, carbon filter, etc.) is well below 250 euros. So about half of what one of the lights in my main tent costs. lol.
Once the light was installed in the tent, it was time to move the left girl. First, I carefully removed the scrog net, and it was pretty easy as the plants hadn't grown into the net yet. The small tent has a tiny door that it was a challenge to get the girl in but with some help from my girlfriend and some brute force; the plant went in. It is very tight in there, and I will have to do some selective pruning for sure, but I'll do that over the weekend.
In the main tent, I moved the girl into the center and put back the scrog net. I will have to train her further to fill up the space entirely, so maybe I do another week of veg after all. I'll work on her over the weekend as well and see where I'm at on Monday.
I adjusted the lights to read similar PAR levels at canopy level in both tents, but once I go into flower, I'll bump up the main tent as I have CO2 in there, so the girl should be able to handle more light and heat.
Finally, I gave each girl 3 liters of pH 6.1 water.
I had to use the ultrawide lens on my phone to capture each plant in the photos. Fun to finally use that lens :)
Day 41
Today I moved the small tent back into its stealth location, another IKEA wardrobe. There's no real risk that anyone would discover my grow but I still prefer to keep everything as hidden as possible. Watered the girls, each one with 3 liters of pH 6.5 water. I also removed all LST wires from both plants but attached some new ones for the right girl. (I'm going to keep calling them left and right even though they aren't in the same tent anymore.)
Finally, I defoliated the bottom of the left girl. That's it. All in all, a really chilled day.
Day 42
Today was the last day of week 6 of vegetation. I know I said earlier this week that this would be the last week of vegetation, but I might veg the right girl another week. To give her a bit more time to fill out the tent. I'll decide that tomorrow, but in any case, I'll flip the left girl as her tent is so tiny, and I don't want her to get any larger.
The left girl is now 38 cm tall, and the right girl is 46 cm tall.
The right girl got 4 liters of pH 6.1 water today as she is sooo thirsty right now, but the left girl didn't need any today, so I left her alone.
I started brewing some compost tea (worm castings, rock dust, biochar, lime, bentonite, neem meal, kelp meal, and molasses) as I want to do one final foliar feed tomorrow before sending the girls into flower.

Processing
Likes
17
Share


@DudeGrowsWeed
Follow
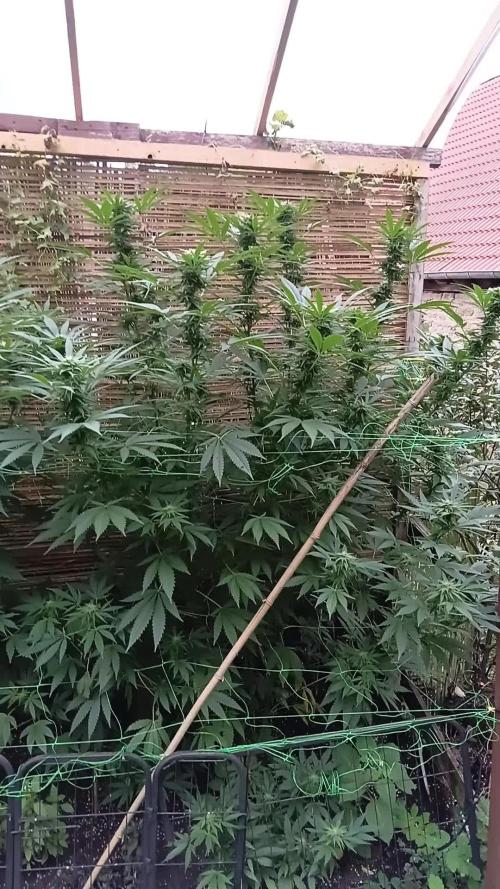
Alien Vs Triangle growing strong, Nice amount of growth in the past week. I'm thinking of giving her a 90 degree LST bend in about a week since that seemed to work really well with my Mexican Airlines.


Likes
3
Share


@tontodedoverdee
Follow
15/2
So the plant it's growing much faster, i keep bend the top branch every 24H without any big sign of stress maybe also because she been trained since her first week, I've also start to bend on the side some sides branches trying to give a good canopy and space to the plant, from this week I've also start giving some green sensation from Plagron and i can already notice a good amount of pre flowers and sweet smelly tops

Likes
69
Share


@nonick123
Follow
Día 37 (08/07) Ajustes de LST en todas las plantas! 🚀
Día 38 (09/07) Ajustes de LST en todas las plantas. Las ramas inferiores están creciendo como un cohete! 🚀😍
Riego con 250 ml H2O pH 6,5
Día 39 (10/07) Las plantas se muestran sedientas! Creo que el cepellón está lleno de raíces y piden el trasplante!
El crecimiento no se ha visto afectado de momento
Riego con 500 ml H20 pH 6,5
Día 40 (11/07) Paso a regar con 500 ml / día, ya que hace mucho calor (30 ºC) y efectivamente las plantas ya han copado la maceta de raíces
Riego con 500 ml H20 pH 6,5
Día 41 (12/07) Riego con 500 ml H20 pH 6,5
Clones! Mi experimento vuelve a demostrar que NO necesitas complejos productos de clonación ni sistemas para obtener clones!
Hace 15 días puse 2 clones con el tallo sumergido en miel durante 5 minutos en una maceta de 400 ml con PRO-MIX HP BACILLUS + MYCORRHIZAE
He mantenido la humedad alta con una cúpula de humedad casera hecha con una botella de agua PET de 5 litros cortada por la mitad y pulverizando a diario.
Han estado los 15 días en mi terraza con luz indirecta, y temperaturas que rondan los 30 - 32ºC durante las horas centrales del día
Hoy los he trasplantado a una maceta de 1 litro porque ya habían formado raíces y empezaban a formar nuevas hojas!
🐥🐥🚀🐥🐥
Día 42 (13/07) Riego con 500 ml H20 pH 6,5
Día 43 (14/07) Trasplante a maceta definitiva de 21 litros de ROOTPLUS Pot de GSKOREA GLOBAL!
Estas macetas son una maravilla!
Proceso de trasplante:
Se prepara con 17,85 Litros (85%) de sustrato PRO-MIX HP BACILLUS+MYCORRHIZAE + 1,05 Litros de Humus de Lombriz (5%) + 2,01 Litros de Insect Frass (10%) + 210 gramos de Earth Vibes Super Soil (10 g/L substrato)
Se llena la maceta de sustrato con las manos (limpias) y rompiendo los trozos más gruesos, para que el sustrato esté aireado y esponjoso, sin presionar
Se coloca una maceta vacía de 6,5L para que quede la forma perfecta de la maceta donde están actualmente
Se espolvorea la parte proporcional de la probeta de microorganismos sobre el agujero de trasplante
Se saca la planta de su maceta actual (bonitas raíces 😍) y se coloca en la maceta final
Se riega muy lentamente hasta percolación profunda con H2O EC 0,5 pH 6,5
Una vez asentada, complemento con un riego de 500 ml con 25 ml/L de Humus de Lombriz Liquido
Se coloca mulch (acolchado) de paja para evitar traspiración excesiva y cuidar a los microorganismos del suelo
A ver como reacciona al trasplante!
Aplicación foliar Kelp hidrolizado de Lurpe Solutions a 0.25 ml/l
Realizo ajustes de LST aprovechando el trasplante a la nueva maceta. De momento tienen una canopia muy bien formada!
💦Nutrients by Lurpe Solutions - www.lurpenaturalsolutions.com
🌱Substrate PRO-MIX HP BACILLUS + MYCORRHIZAE - www.pthorticulture.com/en/products/pro-mix-hp-biostimulant-plus-mycorrhizae

Likes
47
Share


@Mrs_Larimar
Follow
Monday,March 1st.
Second Week of Flower starts.
Those Plants growing like Masters, Drinking around 0.7l each Day
Only Benefical Drinks, because they sit in amended Soil
( EASY BOOST ORGANIC NUTRITION)
I was watching them very carefully, because they moved into abigger Tent,
with Double amount of Light.
But it seems to be allright for them. Looking gorgeous, green and Happy

Likes
21
Share
@Mrs_Larimar
Follow
2025-10-02
The weather changed to the good-
its clear and dry
means short foggy mornings and then comes the sun- and stays until evening
in the night its pretty cold
so maybe we will see some purple?
Likes
8
Share


@Aircoholic
Follow
Growing well, so far. The added silica shows its effect - the stem is absolutely massive and solid, don't think LST is an option. I want to do either Topping or FIMing, but am not sure yet, which one. The decision will be shown in the pictures that I'll add, once the procedure is done.
UPDATE: I decided to top Banana Kush Auto, as seen in the added photos and video.

Likes
27
Share


@Silverback_Guerilla
Follow
4/5:
Took 4 cuttings from the shortie
4/12:
All 4 are rooted and growing!
5/1:
Transplanted from 1gallon pots to 5 gallon pots.
5/3:
Decided to grow one of them in my tiny tent and the other 3 will go outdoors.
5/4:
Took 2 of them outdoors under the 270w and sunshine.
5/6:
Trained all of them today and fed some boomerang along with the kelp, molasses, big bloom, and silica. Foliar fed and took the last one outdoors.
The one in the tent is really flourishing!
5/7 - 5/17:
Excellent growth! The supplemental lights are making all the difference.👍
Did some more training on all of them early in the week.
The one in the closet is spreading out nicely and budding up pretty quickly...but what's very cool is that all 4 clones outdoors are flowering?!?!? I sure hope they go ahead and finish rather than starting to revegetate as the days continue to get longer.
Much rain for the past few days, but it let up long enough for me to install another 200w of waterproof 3000k LED lights a couple of feet above them. Very intense lighting, great bang for the buck. So now, I've got 350w of 3000k and 120w of 6500k in the outdoor garden. That's gonna have to do it, as I also am using 1400w in my indoor gardens, plus a/c..bills are getting ridiculous.
5/18 - 5/28:
The clone in the tent is still stacking up really well. I guess the ones outdoors are too, but next to the seedling plants, they seem puny. Many buds though...
Since they decided to flower early, I sprayed them all down with a product that is loaded with hormones and auxins and stuff that's supposed to retard vertical growth and promote branching. It's also supposed to speed arvest time by as much as a week. I hope they can finish before the summer solstice (June 21), otherwise they might try to reveg instead of finishing..
Hopefully it helps keep them from stretching so much that I'll have to supercrop them. Their mamma was a shortie, so they really shouldn't get too tall anyway.
I also foliar fed them several times this week with something called MicroLife Maximum Blooms, Pow! They love the stuff!
5/28 - 5/31:
I did some training on a two of the outdoor clones early in the week between rain showers, and foliar fed with Microlife maximum bloom formula. She was looking a little N deficient, so I assume the dry amendments have petered out. They were dry enough, so I top-fed her with another couple tablespoons of cavern culture and on the 31st. I gave them big bloom, tiger bloom, grow big, beastie bloomz, silica, endoboost, signal, humic acid, liquid kelp/fish emulsion, and liquid molasses. The indoor clone is looking awesome. I fed her heavily on the 30th.
It just feels so strange that I'll be harvesting outdoor photos in June!?!
That's it for week 8-
6/1 - 6/8:
Early in the week I gave them about a half gallon of water with liquid molasses, cal-mag, silica, and beastie bloomz only.
I foliar fed them a couple of times during the week, right at daybreak.
I fed them on Saturday, the 6th..about a gallon each..beastie bloomz, microlife maximum blooms, cal-mag, humic acid, grow big, big bloom, sweet & sticky, and signal.
They are looking very good..buds galore. The indoor clone got the same nutes, but on different days. She's also covered in buds, and they are beginning to fatten up.👍
6/9-7/4:
Busy with other gardens, so not many updates...
Indoor clone got to spend the last 2 weeks of her life in my closet under the quantum boards and UVB. I harvested and washed her buds on 6/28, let her hang dry and weighed and jarred her up on the 4th of July. She came in a 111g of cola and 45g of lower bud with only about 5g of larf. Nice!👍
She smells just like her mommy and has the same uber-dense buds. She was topped, so the buds aren't as mighty as the mamma's, but much more plentiful.👌
Outdoor clones:
I had a massive spider mite attack, and during the same week, I had a grasshopper invasion...I lost a few plants, one of which as a FFT1 clone.
I had just harvested my autos and my indoor clones from the closet, so I moved the remaining two clones in under the quantum boards. I treated them for spider mites several ways for several days and have given them much TLC. Hopefully their buds fatten up some more. They stanky, but they kinda slim...
7/11:
I harvested the last two clones tonight. So sticky!!! I washed them and hung them to dry.

Likes
16
Share


@TheCannaProphet
Follow
Auto run finished. Flipping photo's to 12/12 next week! Going to install trellis netting, attaching it to the HV kit framing. Going to throw a 3rd LEC 315 CMH in the tent with plans to replace with a HLG 650R LED.


Likes
2
Share


@Munchiesfrommars
Follow
It was a bit difficult to start but I guess it will be a good one
Very interesting to grow this kind of strain
There is no reports about this one!
Hope it will be big!


Likes
567
Share


@Rock_n_Roll_Randy
Follow
It's been 31 days of flower now and
The gals are still loving the fc4800 and their new 8x8 mars hydro grow tent as much as I do👍 leaves are sticking straight up towards the light. Lots of unexpected colors coming out now. Love how easy the zippers are to open and close. Nice and strong and guaranteed to last. It has extra material on the backside of the zipper that helps for light leaksand enough ports and vents for anything you need in it👍. the tsw2000 is still going strong and is also a very good light. Its been going almost nonstop for 6 months and still working the same as when I got it👍. not much heat off both lights but the fc4800 is alot cooler and the heat-sinks work extremely well. I have it daisy chained to the tsw2000 and 1 dimmer controls the other and i don't need to be reaching in too far to dim the other light, it's awesome and I can't wait to buy more lights to daisy 4 together👍. I would recommend this light to everyone that grows with leds and have trouble with temperatures getting too high. Even if you grow with HPS lights I think any mars hydro light is a MUST TRY. I like how heavy both lights are because I know it means they are built soild and strong 💪. Very good sign with the frost they are starting to get thanks to bith mars hydro lights. I can notice more frost under the fc4800 and I'm thinking it's from the UV DIODES they put on the fc4800 👍. 2 days ago they all smelt like my nuken, sweet marshmallows. But now I can smell the monkey dough and gorilla glue and skunk monkey coming through👍. I touched a bud on the gorilla and monkey fingers smelt like fruit loops👍 really pleasant smell. Lingered on my fingers for atleast 30 min. I'm glad mars hydro is under priced compared to some brands and for how popular they are. usually companies would charge more. Thanks mars you guys are awesome 🤘🥁🎸. I'm getting a new exhaust fan soon. An 8 inch that will work alot better than my 4 inch lol. Wayyy to small for a 8x8 Grow Tent. Dehumidifier is going almost non stop to try and get the humidity down. I love how both lights on 100% power only raise my temperature 2 or 3 degrees 👍. You can rest your hand on the lights and not much heat comes off them. Obviously there is some heat but for the brightness of the lights and only raising the temp that much is awesome 👌. And if I wanted to I could remove the driver from the fc4800 and run it on the outside of my tent because the cord is so long but 2 or 3 degrees is barely nothing👍. The girls are starting to bulk up abit now and only 3 weeks of flowering, these lights are awesome 👌. My last run of monkey dough and gorilla glue didn't start showing alot of crystals until week 4. These were only 2.5 weeks and I started noticing some frost. Next week I will be able to tell more about what these custom bred seeds will be like. I love how the smell is changing now. Didn't want all them to smell like nuken marshmallows lol. It's awesome that I can get right inside the tent to do any work i need👍. Even if I wanted an 4x8 tent. I'd rather this 8x8 because it's so easy to work with the plants and have so much room to move around and massive headroom when I'm in there chillin with the gals🤣🤘.
FOR EVERYTHING MARS HYDRO VISIT:
Www.mars-hydro.com
PROMO CODE: rocknroll
Instagram: @marshydropenny
https://youtube.com/channel/UChU5ZWwNi-DvnO3oWVU3ceA
Thanks for taking the time to read and check out my shit🤜🤛
GET THE MAX FROM MARS👍: Welcome one of the newest members of the Mars Hydro family🤜🤛🤘. The Mars Hydro FC 4800 480W LED Grow Light can accommodate up to a 4' x 4' area for flowering. It has OVER 2000 LED chips consisting of the best selling Samsung LM301B diodes which has a Luminous Efficacy of: 220 lm/W
0.2 W, 3 V mid power,
Osram 660nm Diodes, Infrared light and UV LIGHT👍. It boasts the incredible efficiency of 2.8 µmol/J, maximum 2.5gram yield per watt with 30% higher Average PPFD. This High-intensity spectrum is beneficial for plants at all stages - from veg to bloom, and creates Big dense Buds👍. achieve 50% higher yields & quality compared with the old lights! Only consumes 480W for 4x4ft personal grows, and 3x3ft for commerical grow. It comes with a dimmer and daisy chain function with a maximum of up to 15 lights, the master light controls the rest👍. Wide 6-bar design offers even & wide canopy coverage and can maximizes your grow space. slim 180° FOLDABLE DESIGN... YES I SAID FOLDABLE🤘🤣 , making it compact and easy to install, it's IP65 WATERPROOF and will give you no worries while growing in a humid environment and makes it a flexible high performance commercial grow light for enormous SUPER FROSTY yields.😛😛😛. MARS GETS EM FROSTY BOYS👍
AWESOME HEAT DISSIPATION: The Low energy consumption FC4800 growing light has 6 passive-cooled bars and an aluminum heat-sink a removable driver you can upgrade later or have it outside your tent. with zero noise you can save up to 50% in your electricity bill compared to HID's or HPS lights!
It also has a removable driver so you can upgrade it in the future or have it outside your grow space for better heat control in your growroom👍
UPGRADED FULL SPECTRUM: Yield Max Spectrum with enhanced red (Top-Bin Samsung 3000k-5000knm, Osram 660nm Deep Red), speed up blooming & fruiting, perfectly suited for full-cycle growing. The FC4800 LED grow lamp was born for Big Buds, perfect for commercial, grow tent, grow room, hydroponics, and all soil grows.👍
THE BEST SAMSUNG DIODES: THE FC4800 has Top Bin genuine Samsung Osram Diodes, combined with remarkable 2.8 µmol/J Efficacy, 30% higher Average PPFD, 50% less energy consumption, to maximize your yields. They give you a TRUSTED 3 years warranty 100% Satisfactory guaranteed!!!
The MARS HYDRO 8x8 Grow Tent interior is made of a unique diamond design mylar which is highly reflective. (Other companies mylar and reflective rate is as low as 50%, and it won't provide efficient light. They use thick 1680D oxford canvas, and being double stitched, it is tear proof and perfect for locking in the light. Their grow tent keeps 100% of the light inside the tent and helps your plants absorb more light. EXTRA-THICK material means No light leaks or rips at all.👍
Strong Stable metal corner adapters and poles are the trustful supporters of the tent. It's very sturdy, neither rusting or paint flaking off. quick and easy tool-free setup. They use heavy-duty metal zippers, with double layer black lining, by far the best on the market which creates a light-proof seal.
The Easy observation windows are made by double layers of cloth. Observe the growing conditions of your plants without opening the tent and avoid disturbing your plants. The observation windows also serves to dissipate heat and ventilate the air.
The tent includes 2 removable waterproof floor trays to hold soil and water. The removable tray can be taken out to wash easily.
They guarantee the grow tents are easy to install even if you've never done something like this before. Clear Instructions and no tools needed! They also offer 30-day unconditional refunds for quality problems. Just contact their friendly 24 hours customer service 👍
Likes
6
Share


@TGriner420
Follow
This week was a real breeze! She's gaining a ton of weight on the bud sites and she's really growing nicely! She's starting to bud around the flowering sites and really finishing nicely. The formation of bracks and the formation of the buds is my favorite part because that's when you get to see somewhat of the final picture and the time the flower is most colorful! Now the second best part is harvesting the flower for smoking which will be occuring soon! The smell on these girls is very invigorating!! She's putting out a smell of a Lemon Cherry Now n Later! You can smell the Lemon and Cherry right away when you open up the tent! I can't believe how big she's got and how beautiful they are coming along! I have to say that this is one of my favorites to grow and my favorite smelling strain! I also love the way the flowers are stacking on the colas!!! The frost on top of the cola leaves is insane! During the day I drop the humidity down to 45-50% and then at night I raise the humidity up to 60-65% which helps a ton with flower promotion during the flowering stage! Also, I raise the temperature during the day to 80° and at night I lower the temperature to 55°-60° which helps mimic the autumn temperatures that aids a ton in flower production in the flowering stage!!! I'll be stopping the two Lemon Cherry Cookies Auto's from receiving any synthetic nutrients and flushing them now since harvest will be within the next two weeks or so! I'm doing that because they stop taking nutrients in and start to self canabulize as a normal (ending) part of plant life. Then I'll give the two ladies plain pH balanced H20 for the next 2 weeks to flush any and all nutrients out of them. Then three days of darkness. Finally I'll chop them down to hang in my harvesting closet for 7-14 days with a dehumidifier on at 65% humidity. Then I'll place the flower into the trimmer and then into the grove bags for the last step in harvesting! The grove bags will keep the flower at 58-62% humidity. They also help keep the flower fresh longer, the Terpenes fresh, the Terpenes flavors, and from becoming moldy or dried out! I've used both these and the mason jars with boveda humidity packs but to me the grove bags are a must and a go to fail safe!!! All you do is hang your buds upside down at 60/60 or 65/60 for 7-10 days or until the braches snap and make that noise. Thanks and as always stay safe, stay high, and stay blessed!
Likes
4
Share


@I_Identify_As_A_Dan
Follow
Week 4 for 9lb hammer, have topped this plant at the 4th node finally getting some lateral growth. Still haven't transplanted just waiting for 4 other siblings to grow a little bigger before i gender text them😇 Maybe anther week before doing so.
Likes
28
Share


