By continuing to use the website or clicking Accept you consent to our cookies and personal data policy and confirm that you are at least 18 year old. For details please see Privacy Policy and Terms
Accept
Likes
Comments
Share


Likes
55
Share


@Hempy_The_Kid
Follow
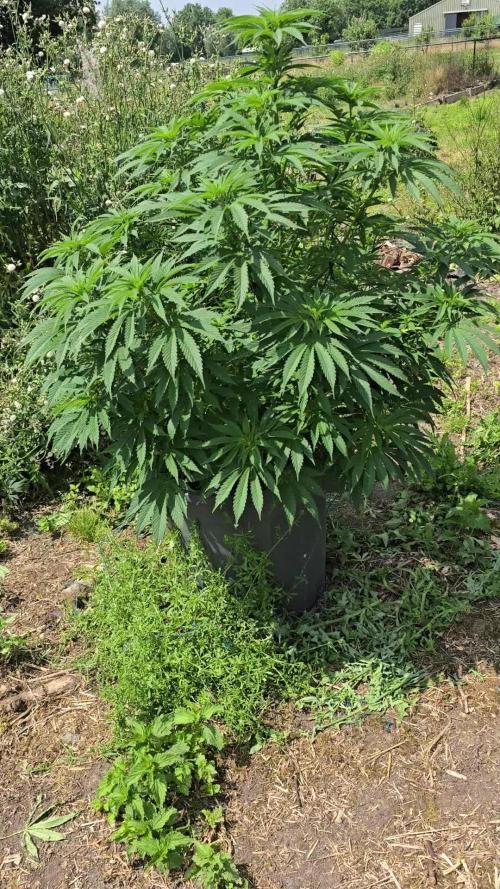
01/12/22 irrigated 1 gallon water PH 5.85 TDS 403 gave 2 quarts recharge.
01/13/22 irrigated 1 gallon water PH 6.04 TDS 403. Topped 4 more spots. Growth has picked right back up after the PH mishaps.
01/14/22 re-potted to #5 nursery pot. Set up watering system. Now irrigating itself 1 time per day @ 50 gallons. Set PH 6.03 TDS 520.
01/15/22 adjusted TDS to 499 PH 6.0
Currently have 16 tops
01/16/22 PH 6.03 TDS 505
01/17/22 PH 5.93 TDS 520
01/18/22 PH 5.95 TDS 499 topped 4 more spots.

Likes
14
Share


@HanfConnoisseur
Follow
Week 1: Transition to Flowering
Welcome to the fifth weekly update of our cannabis cultivation journey in Germany! As we transition from the vegetative stage to the flowering stage, our strains—Pulp Friction, Cookies Haze, Eleven Roses, Poddy Mouth, Critical Lemon Kush, and OG Kush—are ready for the next phase of their growth.
Before entering the flowering stage, we took a few important steps to prepare the plants for optimal flowering.
Key Developments:
1. Pre-Flowering Preparation:
- The plants were defoliated to remove excess leaves and improve light penetration and airflow.
- Each plant was repositioned to ensure they have ample space and light exposure.
2. Growing Medium and Setup:
- The plants are grown in a mix of living soil, coco coir, perlite, and clay pebbles.
- The soil mix includes mycorrhizal fungi cultures to support healthy root development.
3. Watering and Nutrient System:
- The plants are watered from the bottom using an AutoPot system, which provides a consistent supply of nutrient solution.
- The pots are equipped with air domes connected to an air pump, delivering oxygen directly to the roots to enhance growth.
Steps Taken:
1. Defoliation and Positioning:
- Carefully removed excess fan leaves to improve light distribution and airflow within the canopy.
- Repositioned the plants to ensure each one has enough space to grow and receive adequate light.
2. Watering and Nutrient Management:
- Set up the AutoPot system to supply a balanced nutrient solution to the plants.
- Ensured the nutrient solution is appropriate for the flowering stage, with a focus on supporting bud development.
3. Air Domes and Oxygenation:
- Connected the air domes to an air pump to deliver oxygen to the root zone.
- Monitored the air pump to ensure consistent oxygen flow to the roots.
Next Steps:
- Monitor the plants closely for signs of flowering and adjust the light cycle to 12 hours on and 12 hours off to initiate and support flowering.
- Continue to observe the plants for any signs of nutrient deficiencies or excesses and adjust the feeding regimen as needed.
- Ensure the AutoPot system and air domes are functioning properly to maintain optimal hydration and oxygenation.
Stay tuned for next week’s update, where we’ll discuss the progress of the first week of flowering and any adjustments made to the care routine. Feel free to ask any questions or share your own experiences in the comments below!


Processing
Likes
24
Share


@Cogollo_eu
Follow
**Encontrarás la traducción a español al final de la descripción**
If you like this week, please hit a like, it costs you nothing! 👊. Thanks in advance 😉!
From/Desde: 09/09/19 || To/Hasta: 15/09/19
From day/Desde día: 49 || To day/Hasta día: 55
-----IMAGES & VIDEOS-----
V2 - Alice.K. overview on 12/12 switch
P01 - Day 50 (34 cm)
P8 & P9 - EyeFish Lens Shoots 🐡
P10 - Lens shadow in lower left corner 😤😤
P13 - Day 53 (36 cm)
P21 - Day 55 (39 cm)
P25 & P26 - 3D designed & printed branch supports
-----WEEK SUMMARY-----
This is the last week of growing, from Thursday I will be lowering light hours @ 1hr/day and the Sunday 2 hours reaching 12/12. Also on Thursday, I started to give her Bud Ignitor to help Alice.K. with the pre-flowering stage.
From now on i will have very few night shoots as at the end of the week I placed and fixed the SCROG mesh, so I can't move the plant anymore. Later in flora i will try to do some at night inside the tent, I need to make some tests before, and see how she responds, as I don't want to stress her with night light along flowering time.
Finally on Sunday I designed something to support the lower main branches, I only have photos with one branch supported as I taked the photos while the rest of the supports were printed.
-----WATERING CALENDAR-----
11/09/19 (Day 51) - 3,000 ml with all week nutrients -(Bud Candy & Silica Power) & Organic Growth Nutrition only 1.5ml/l @ 1.25 E.C. PH6
15/09/19 (Day 55) - 3,000 ml with all week nutrients -(B-52) @ 2 E.C. PH6.1
*****ESPAÑOL*****
Por favor, si te gusta esta semana dale un like, no te cuesta nada 👊. ¡Gracias por adelantado 😉!
-----IMÁGENES & VÍDEOS-----
V2 - Vista de Alice.K. en el cambio a 12/12
P01 - Día 50 (34 cm)
P8 & P9 - Capturas con ojo de pez 🐡
P10 - Sobra del objetivo en una esquina 😤😤
P13 - Día 53 (36 cm)
P21 - Día 55 (39 cm)
P25 & P26 - Soportes para las ramas inferiores diseñados e impresos en 3d
-----SUMARIO SEMANAL-----
Esta es la última semana de crecimiento, desde el miércoles comenzaré a bajar las horas de luz 1 hora/día y el domingo 2 horas bajando hasta 12/12. También el miércoles empecé a usar Bud Ignitor para ayudar a Alice.K. con su etapa de pre-floración.
A partir de ahora tendré pocos disparos nocturnos. Al final de la semana he fijado la malla de SCROG, y no podré mover más la planta. Más entrada la floración haré unas pruebas nocturnas dentro del armario para ver cómo responde a las fotos nocturnas, ya que no quiero estresarla con luces por la noche durante la floración.
Finalmente el Domingo diseñé e imprimí unos soportes para las ramas inferiores, sólo hay fotos con una de las ramas sujetas, ya que hice las fotos mientras se imprimía el resto de los soportes.
-----CALENDARIO DE RIEGO-----
11/09/19 (Día 51) - 3.000 ml con todos los nutrientes semanales -(Bud Candy y Silica Power) y de Organic Growth Nutrition sólo 1,5ml/l @ 1,25 E.C. PH6
15/09/19 (Día 55) - 3.000 ml con todos los nutrientes semanales -(B-52) @ 2 E.C. PH6,1

Likes
132
Share


@Crashoverite
Follow
Hi all👨🌾👋
Welcome to my another Fastbuds journey.This time strain of choice - Tropicana Cookies Auto. One of the strongest and tastiest autoflowers available. Just couldn't resist to give a go 😁🤤
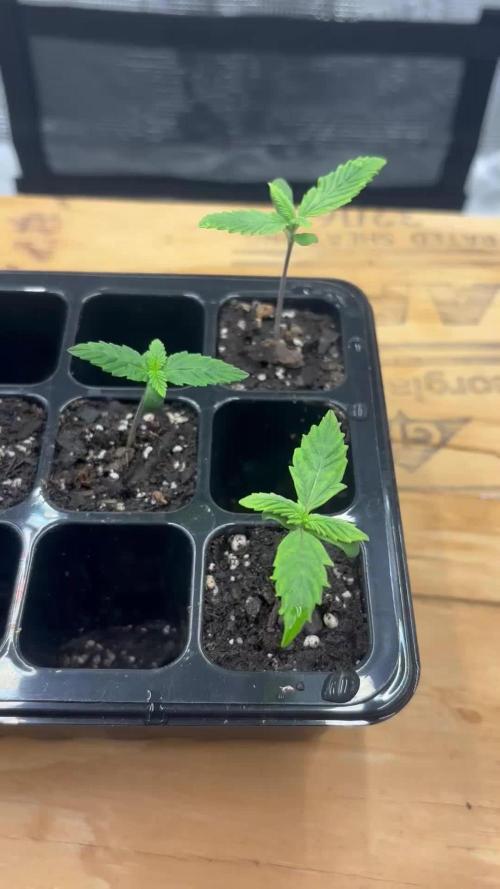
Week 0
Germination
Jan 25-Feb 1
Germination in propagator. beans landed directly in substrate within 5 min after opening the package. Started believing that all methods like glass water, paper towel etc. are really useful if seeds are old, stored incorrectly or coming from shady seedbank. If seeds are from trusted source with strong genetics wouldn't be bother trying anything else than planting your beans directly to substrate.
So far 100% success
This time both baby girls started showing their heads within 2 days after planting seeds.
Jan 25
Seeds planted. Propagator at 20 degrees and 90% humidity.
Jan 27
Girls popped through the soil. Warm welcome to Kitana and Aphrodite 😍
Jan 28-30
Both babies growing at the same pace.
Jan 31
Time to move from this baby size propagator to a better and more comfortable place.
Feb 1
End of germination week. All went painlessly and successfully.
I am super excited for whats to come 😁
Hopefully this will be another easy and successful ride.
Much appreciate all your likes, follows and comments. 🙏💚❤️💜
Peace and love brothers and sisters 👨🌾✌️💚
Stay tuned for more updates
Links
https://2fast4buds.com/seeds/tropicana-cookies-auto

Likes
43
Share


@Sabac
Follow
Semana 4 de flora están a full mis plantitas. Creciendo cada día más y más.
Sanitas.


Likes
3
Share


@SmileyMorgen
Follow
4/27/22
Today makes the beginning of preflower. Notice the light xoxo of her tops. Also today her first white hair popped
4/28/22
Late last night i to the early hours of today I added some.LST clups qnd took 4 large fan leaves from the lower region of the plant to allow some light in to the emerging branches.
4/29/22
Today I did her first major defoliation. I only.took leaves on the inside margin of the plant that blocked light from emerging branches. This part of ganja growing always scared me because they look so yucky after for a day or two
5/1/22
My lady looks beautiful today. Looking better after her defoliation a few days ago. She I needing about 1 gal of plain dechlorinated water every other day to keep her topped off. She is drinking some water! I'm assuming this will mean I will have to feed her more that once weekly as well.
5/2/22
I realized today that the white hair I was seeing were just the plant reaching maturity and showing her gender... she is not behaving like a plant in flower. I have decided to change my light cycle to 12:12 in order to flip her I to flower. This is because she is getting too large for her to fit in my tent if she were to continue to veg any longer. The stretch during the first two weeks of flower will likely have my 4x4 filled up.


Likes
9
Share


@theVotanaGarden
Follow
Cutting this plant down around day 67/68. Starting to let the plant dry back every other day. I’ve had to lower the light intensity the last few weeks of flower because of temperatures but it still looks pretty good!
Likes
3
Share


@fabialien
Follow
3ra semana de vida. Fotos y videos del dia 2 de Agosto 2024, las cepas van bastante bien, una gorilla murio pero vendrán nuevas BSF


Likes
18
Share


@valiotoro
Follow
Hello everyone 😎
Week 6 of flower for the Amnesia Zkittlez🍭
Only 1 plant left then finito✔️
Very nice smell super sweet🤤
The buds are super sticky🔥
Likes
10
Share


@AMNESIAHAZEPK
Follow
ok so i started shifting the plant outdoors from sunrise to sunset one of the plants started getting heat stroke and borders of the first pair of leaves got yellow although all three plants were under the same conditions i started watering it more now it is showing success too. when indoors all3 plants are undel cfl light. i am going to transplant them next week and start adding nutrients in this week will also add a little bit of potting mix soil inwitht he peat moss and perlite when transplanting. also will use 35% dose of nutrients NPK only atm with nitrogen higher in liquid form.
going to start rcvng more seeds in 15 days and my target is of 40 plants. working on getting the infrastructure made outdoor of glass roof and steel frame so that i dont have to move the plants and they can be lit in the structure after sunset

Likes
7
Share


@Sea_canna_blubb
Follow
Zu letzter Woche hat sich nicht viel geändert außer dass sie noch doller riechen und ihre Buds immer dicker werden 🌿😋🍇
Die Trichome einer Pflanze sind schon sehr bernstein farbend 🍯


Likes
2
Share

@Robertgrowsit86
Follow
We are gonna up pot today. There was one that the shell of the seed stayed on Alil longer than I like but I don’t like to touch them to much at this stage. But I did help the little one out and take it off yesterday. They have been in these for 6 days. Took 48 hours to pop the tap root. And now we are gonna be moving them to make them much happier. Will post updates soon
Likes
3
Share


@TGriner420
Follow
This week was a real breeze! She's gaining a ton of weight on the bud sites and she's really growing nicely! She's starting to bud around the flowering sites and really finishing nicely. The formation of bracks and the formation of the buds is my favorite part because that's when you get to see somewhat of the final picture and the time the flower is most colorful! Now the second best part is harvesting the flower for smoking which will be occuring soon! The smell on these girls is very invigorating!! She's putting out a smell of a Apple Tart! You can smell the Apple Strudel right away when you open up the tent! I can't believe how big she's got and how beautiful they are coming along! I have to say that this is one of my favorites to grow and my favorite smelling strain! I also love the way the flowers are stacking on the colas!!! The frost on top of the cola leaves is insane! During the day I drop the humidity down to 45-50% and then at night I raise the humidity up to 60-65% which helps a ton with flower promotion during the flowering stage! Also, I raise the temperature during the day to 80° and at night I lower the temperature to 55°-60° which helps mimic the autumn temperatures that aids a ton in flower production in the flowering stage!!! I'll be stopping the two Apple Strudel Auto's from receiving any synthetic nutrients soon and flushing them once harvest is closer. It will be within the next two weeks or so! I do that because they'll stop taking nutrients in and start to self canabulize as a normal (ending) part of plant life. Then I'll give the two ladies plain pH balanced H20 for the next 2 weeks to flush any and all nutrients out of them. Then three days of darkness. Finally I'll chop them down to hang in my harvesting closet for 7-14 days with a dehumidifier on at 65% humidity. Then I'll place the flower into the trimmer and then into the grove bags for the last step in harvesting! The grove bags will keep the flower at 58-62% humidity. They also help keep the flower fresh longer, the Terpenes fresh, the Terpenes flavors, and from becoming moldy or dried out! I've used both these and the mason jars with boveda humidity packs but to me the grove bags are a must and a go to fail safe!!! All you do is hang your buds upside down at 60/60 or 65/60 for 7-10 days or until the braches snap and make that noise. Thanks and as always stay safe, stay high, and stay blessed!


Likes
2
Share


@EtnoGrow
Follow
here we see how the girls are advancing, the buds are becoming clearer and clearer which makes us feel that it will be a decent harvest at least, we cross our fingers.
Likes
5
Share


@wheedtobeus420
Follow
Day 75. She’s huge and in the dark ice flushing. She smells amazing. I can not wait! 🎂🎂🎂🎂 we also added another meet Mortimer

Likes
27
Share


@LockDownGrow
Follow
Starting too show the early stages of pre flowers , everything has gone nice up until now , she grew a very compact but bushy plant , that seemed too just bush about this week ,